

Before you begin
Make sure you have the following:- Access to WisdomAI: An active account with access to the Agents tab.
- A connected domain: A domain connected to the data you want the agent to work with.
- A delivery channel: Email or Slack, ready to configure. To deliver to Slack, an administrator must first connect your Slack workspace to WisdomAI. See Connect to Slack.
What is Visual Mode
Visual Mode lets you build an agent as an explicit, node-based workflow on a canvas. You define each step: data, AI reasoning, artifact and delivery. The agent executes those exact steps on every run. This differs from Prompt Mode, where the agent decides its own steps at runtime. Visual Mode trades that flexibility for repeatable, inspectable control: you can see exactly what the agent will do before it runs, and trust that it will do the same thing every time.Step 1: Open the Agent Builder
Click Create Agent to open a modal and pick Prompt agent or Visual agent. Choose Visual agent to open the canvas.- Navigate to the Agents tab in the left sidebar and click Create Agent.

- Select the domain your agent will run in.

- (Optional) Edit your agent’s name by clicking on the pencil icon. Add it in the Agent Settings modal and click Save.

Step 2: Generate your workflow with the WisdomAI Builder (recommended)
Rather than placing nodes manually, you can describe your agent in plain language and let the WisdomAI Builder generate the structure for you. The WisdomAI Builder is an AI-powered chat panel built into the canvas. Type what you want your agent to do in the Describe your agent bar at the bottom of the screen. WisdomAI Builder reads your connected domain and data sources, constructs the complete node structure, and renders it on the canvas for you to review, adjust, and publish. You can use the WisdomAI Builder at any point, such as to create an agent from scratch or to modify an existing workflow. For example: add a conditional branch that skips delivery if revenue is above target.
Step 3: Build manually
Use manual building when you want to refine the workflow the Builder generated — swap a data source, add a condition, change an instruction — or when you prefer to place and configure each node yourself. You can build manually from the start or at any time after the Builder generates your workflow. Every agent starts with a trigger node, which defines when the agent runs.- Click the trigger node on the canvas. The Select trigger panel opens on the right.
- Choose a trigger type.
- If you select the Schedule trigger and want it to act only when a condition is met, enter it in the Trigger Criteria field. Leave it empty to run unconditionally every time the trigger fires. Here, also define when the agent runs: Hourly, Daily, Weekly, Monthly, or Custom. Match the frequency to how often your data changes and how quickly you need to act on it.
- Click Done.

Add and connect nodes
Nodes are the building blocks of a Visual Mode agent. Each node performs a specific task. They are connected through Edges, and these also define both the order of execution and how data flows between them.For a full description of node types and how they behave, see the Nodes Reference.
- Click the + button on the trigger node to open the Add node menu.
- Select the node type you want to add.

- Click on it to write an instruction in the node’s settings panel describing what it should do with its input.
- Click Done.

- To add another node, click the circular button on any node’s output and extend the arrow to add the next node in the flow. Repeat until your workflow is complete.
When you hover the mouse over a node, the Delete node icon appears. Click on it. In the modal that opens, select Delete to confirm the operation. This action is irreversible.
Step 4: Configure the Artifact Builder
The Artifact Builder formats your workflow’s output into a finished report for delivery.- Add the Artifact Builder node to the canvas, then click it to open its settings.
- Write an instruction that covers two things separately: how to organize the data into sections, lists, and tables; and how to format the final output: headings, number formats, and layout.
- Section headings: “Section 1: Overview”, “Section 2: Details”
- Table columns: “Include columns: Deal Name, Stage, Days Stuck, Owner”
- Number formats: “Show currency as $X,XXX” and “Show percentages as X.X%”
- Conditional sections: “Only include the Incidents section if incidents occurred.”
- Click Done.
Every agent requires at least one Artifact Builder node and one delivery node before it can be published.
Step 5: Configure delivery
The delivery node sends your artifact to its destination.- Click + after the Artifact Builder node and select Email or Slack
- Enter the destination: an email address or Slack channel name.
- Click Done.

To deliver to Slack, a workspace administrator must first connect your Slack workspace to WisdomAI. See Connect to Slack.
Step 6: Preview and test
At any point before publishing, you can run the agent manually to verify that the output is correct. To do this:- Click Preview in the top right corner.
- You don’t have to wait for the run to finish. As the agent executes, watch the canvas for progress. A green check confirms a node succeeded, a red X indicates a failure. Click the node to see the error.
- At any point during or after the run, click on a node to review the data generated, the analysis performed, and the underlying SQL or Python code used.

- Click End Preview to return to the edit mode and adjust node instructions, trigger criteria, or formatting as needed, then preview again.
Common fixes
Step 7: Publish your Agent
Once the preview output looks correct, make the agent live. To do that, click the Publish button. Your agent will become active instantly.
Publishing also saves the agent’s current configuration as a new version. See Manage agent versions below to view, compare, or revert to a previous version.
Step 8: Manage agent versions
Every Publish creates a new version of the agent. Versions give you a history of every change, so you can see what a past publish looked like or restore it if a newer change causes problems.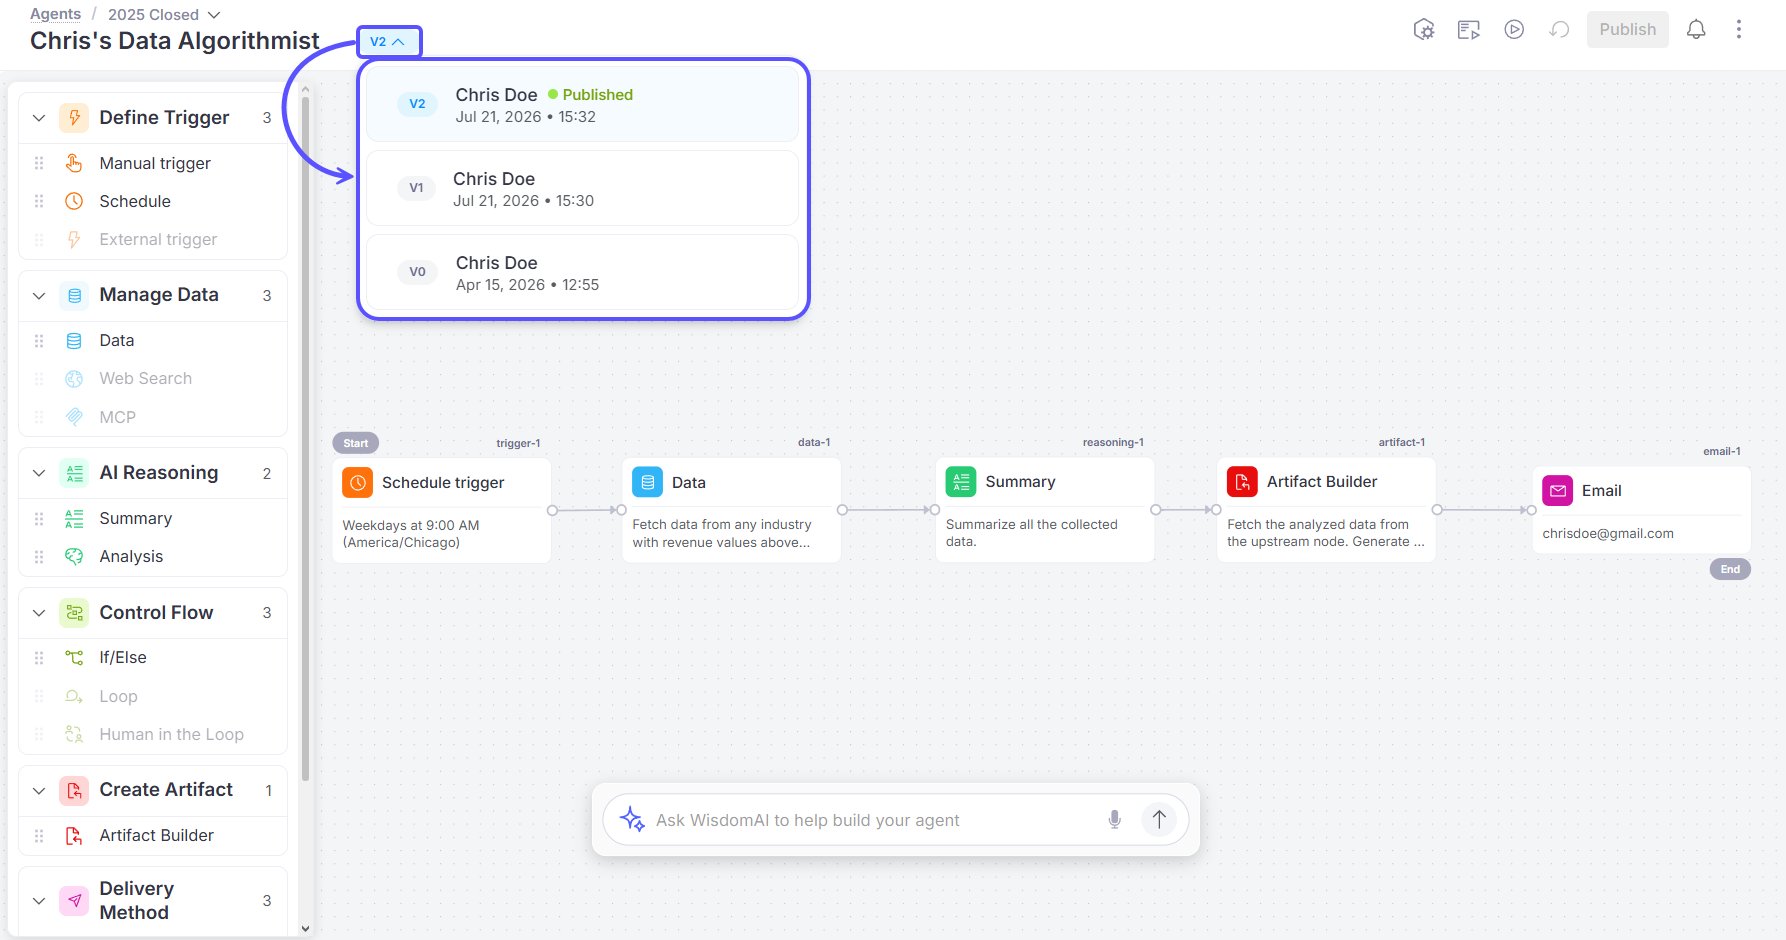
Next steps
Manage your Agents
Learn how to edit, share, and view the run history of your agents.
Nodes Reference
Explore the full list of node types, inputs, and outputs.