> ## Documentation Index
> Fetch the complete documentation index at: https://docs.wisdom.ai/llms.txt
> Use this file to discover all available pages before exploring further.
# Auditing
Effective auditing ensures that your team always has access to trusted, up-to-date information, thereby boosting productivity, supporting faster decision-making, and reducing duplicated work. Follow this guide to implement a scalable auditing process using three key actions:
* [Tag Chats](#tag-chats) to organize and find key insights quickly.
* [View and Navigate the Chat History](#view-and-navigate-the-chat-history) to surface trusted information.
* [Share Vetted Answers](#share-vetted-answers-from-the-chat) to scale knowledge across your team.
## Tag chats
You can organize and categorize your conversations by renaming them. This action enables you to assign descriptive titles that act as tags, making it easier to filter and search for specific topics or keywords across your chat history.
To tag a chat:
1. Navigate to the **Chats** section in the left sidebar and click on it to view your active chat list.
2. In the **Chats list**, find the specific chat you intend to categorize.
3. Click the **kebab menu** (three dots), found to the right of the chat's current title in the list, and select the **Rename** option.
4. The text field becomes active and displays the current chat name, such as “Calculate revenue from won sales by close date.” Type a new, descriptive **name** into this field or add any relevant **keywords** that clearly reflect the chat's topic or project. For example, you might rename it to "Revenue Analysis - Won Sales Trends" or "FC Sales - Q1 2025 Revenue Calculation." This new name works as a tag that helps categorize the conversation.
When renaming chats, use consistent keywords as tags to make search results more reliable and structured. This will serve to filter by keywords in the [Chat Log](#view-and-navigate-the-chat-history).
5. After entering the new name or introducing the tag, click the **Confirm** button located next to the input field.
If you decide not to proceed with the renaming, click the **Go Back** button.
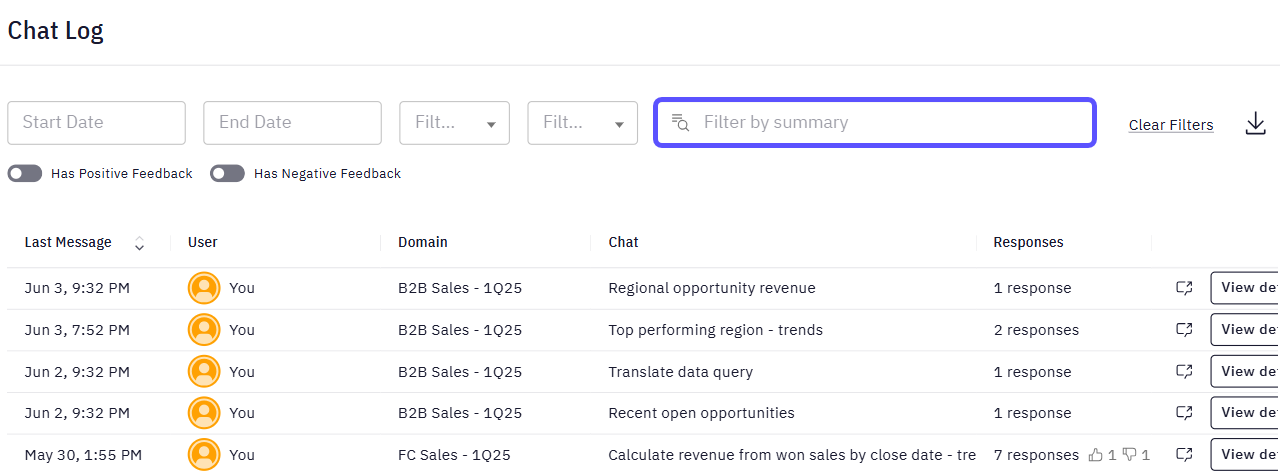
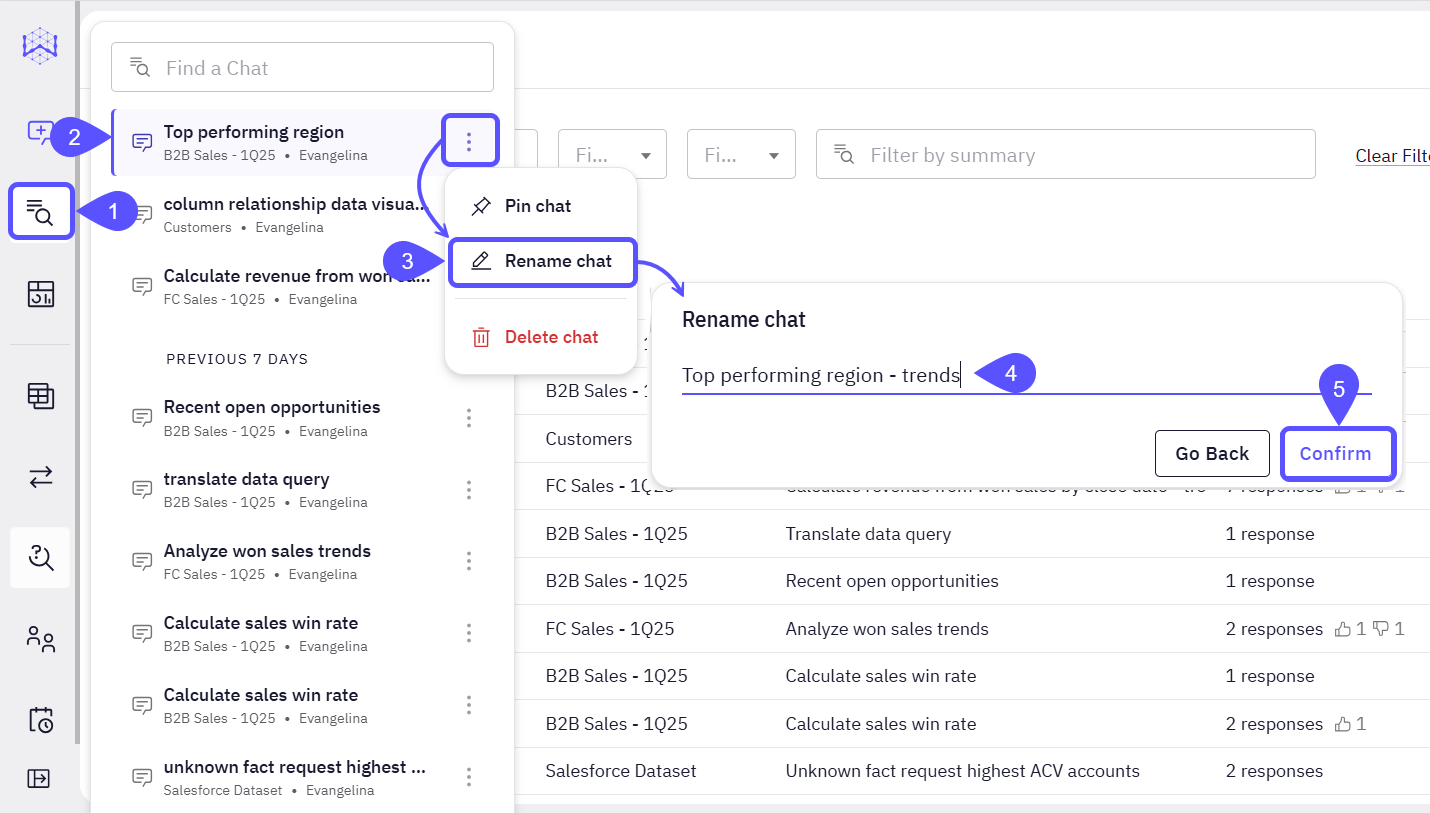 Once confirmed, the chat will be updated with its new name, which will also be reflected in the Chat Log. This change will enhance its discoverability when using the **Filter by summary** option or other search functionalities to locate chats by their assigned categories.
 ## View and navigate the chat history
The Chat Log helps you review valuable information. You can filter, review, and evaluate past interactions to surface valuable insights, identify feedback loops (positive or negative), and access chats to [refine content like SQL queries](/improve-wisdom-ai-responses/validate-and-test-answers). This visibility supports transparency, enhances content quality, and helps maintain a living repository of trusted, actionable information.
To navigate the Chat Log:
1. Access the **Chat Log**, located in the left sidebar, to open its main interface.
2. View **Chat Log entries**. The Chat Log displays a tabular view of interactions, with each row representing a chat entry and providing key metadata:
Indicates the date and time of the most recent message within the chat, establishing a precise chronological order.
Identifies the initiating or contributing user for each chat, ensuring clear accountability.
Specifies the associated Domain (e.g., "B2B Sales - 1Q25," "Customers"), facilitating organized access to information.
Offers a concise overview of the initial query of the interaction or the Chat title.
Displays the number of responses within a chat, indicating the depth of the conversation. Accompanying icons provide additional context on interaction types (e.g., if negative feedback has been given or if the answer has limited context).
3. **Filter** and locate **interactions**. You can efficiently locate specific historical interactions using various filtering options to streamline your review process:
Use Start Date and End Date fields to constrain the view to a specific timeframe, allowing for targeted historical review.
Filter by user to display only chats associated with a particular team member, enabling focused review of individual contributions.
Restrict entries to a selected Domain, facilitating the review of Domain-specific discussions.
Search for specific keywords or phrases within chat summaries, including any tags or descriptive titles you have previously added. This improves discoverability and ensures your team can quickly locate curated content by keywords, topic, or project focus.
Use this button for quick removal of all active filters, restoring the full log view.
## View and navigate the chat history
The Chat Log helps you review valuable information. You can filter, review, and evaluate past interactions to surface valuable insights, identify feedback loops (positive or negative), and access chats to [refine content like SQL queries](/improve-wisdom-ai-responses/validate-and-test-answers). This visibility supports transparency, enhances content quality, and helps maintain a living repository of trusted, actionable information.
To navigate the Chat Log:
1. Access the **Chat Log**, located in the left sidebar, to open its main interface.
2. View **Chat Log entries**. The Chat Log displays a tabular view of interactions, with each row representing a chat entry and providing key metadata:
Indicates the date and time of the most recent message within the chat, establishing a precise chronological order.
Identifies the initiating or contributing user for each chat, ensuring clear accountability.
Specifies the associated Domain (e.g., "B2B Sales - 1Q25," "Customers"), facilitating organized access to information.
Offers a concise overview of the initial query of the interaction or the Chat title.
Displays the number of responses within a chat, indicating the depth of the conversation. Accompanying icons provide additional context on interaction types (e.g., if negative feedback has been given or if the answer has limited context).
3. **Filter** and locate **interactions**. You can efficiently locate specific historical interactions using various filtering options to streamline your review process:
Use Start Date and End Date fields to constrain the view to a specific timeframe, allowing for targeted historical review.
Filter by user to display only chats associated with a particular team member, enabling focused review of individual contributions.
Restrict entries to a selected Domain, facilitating the review of Domain-specific discussions.
Search for specific keywords or phrases within chat summaries, including any tags or descriptive titles you have previously added. This improves discoverability and ensures your team can quickly locate curated content by keywords, topic, or project focus.
Use this button for quick removal of all active filters, restoring the full log view.
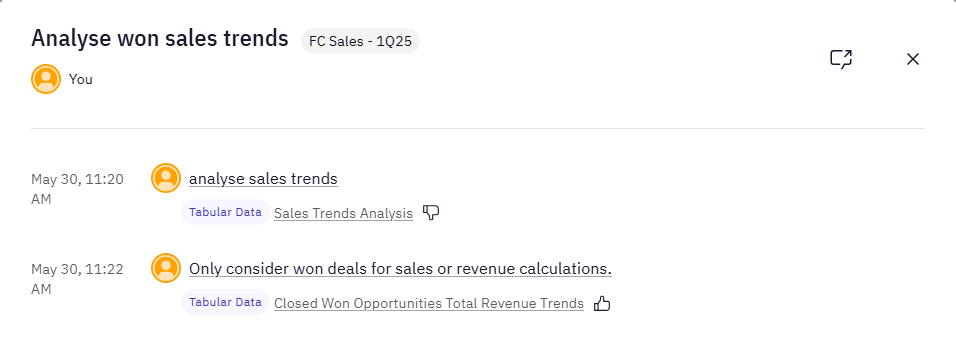
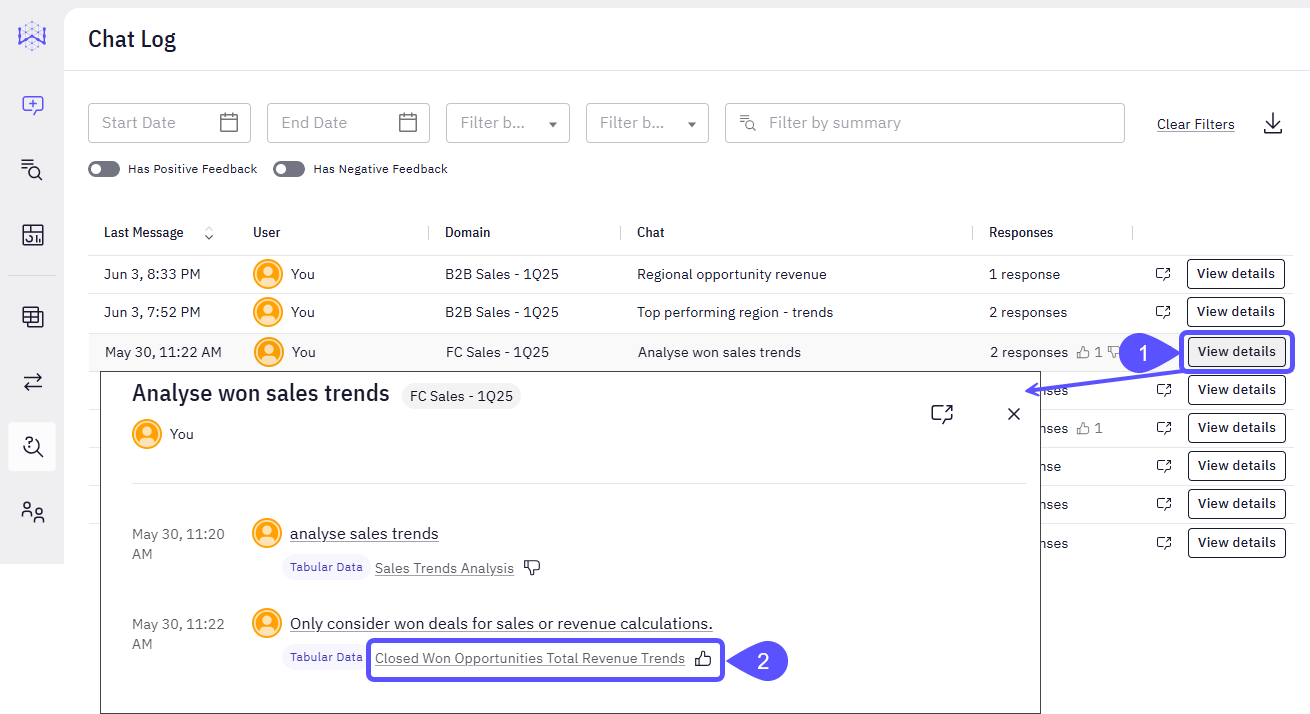
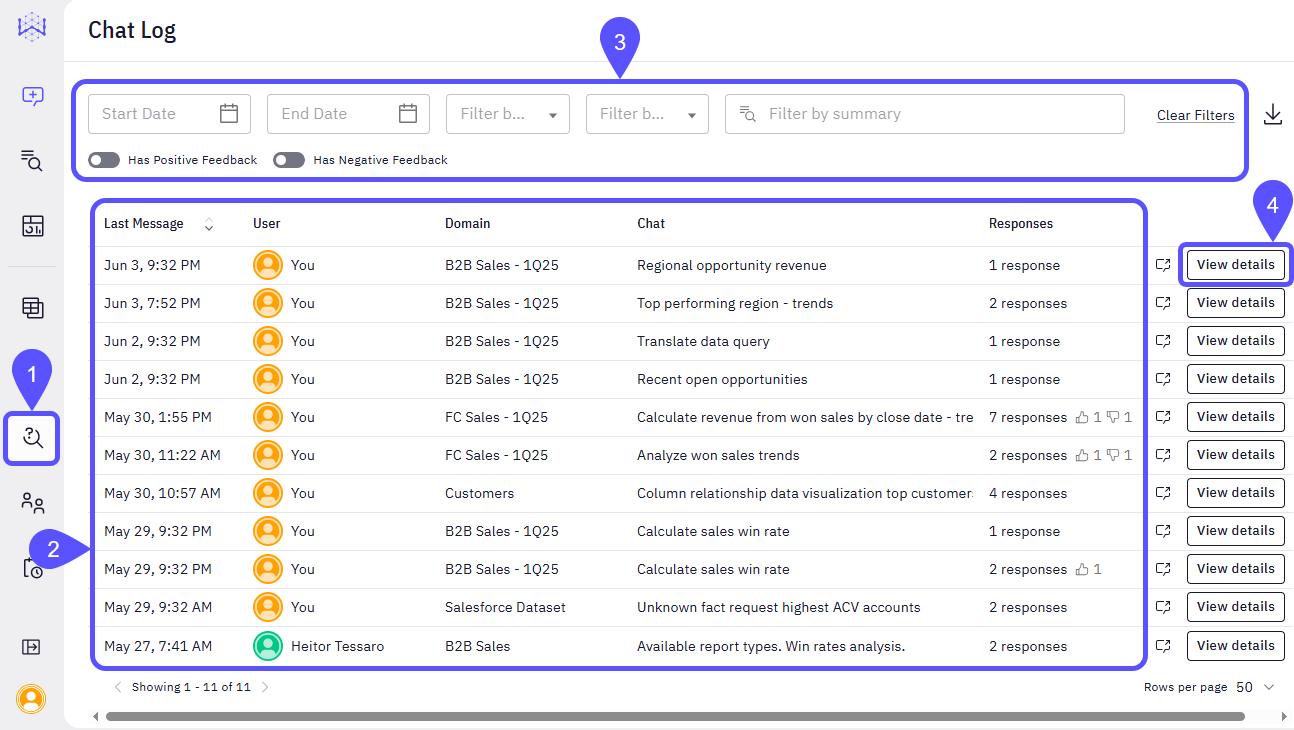 4. Access the detailed chat history to obtain a complete understanding of any interaction's progression and context. Click the **View details** button corresponding to any chat entry to open a dedicated view or modal containing the full chat transcript. Here, you can:
* **Review Full Conversations:** The detailed view presents the entire sequence of messages, queries, and responses chronologically. This comprehensive record illustrates the evolution of information and discussions, providing complete context.
* **Identify User Contributions:** You can see who said what, which helps with accountability and tracking the source of each idea.
* **Explore Data Drill-Downs:** The detailed view provides clickable links to associated data, allowing direct access and deeper examination of underlying metrics and complete datasets relevant to the specific conversation.
4. Access the detailed chat history to obtain a complete understanding of any interaction's progression and context. Click the **View details** button corresponding to any chat entry to open a dedicated view or modal containing the full chat transcript. Here, you can:
* **Review Full Conversations:** The detailed view presents the entire sequence of messages, queries, and responses chronologically. This comprehensive record illustrates the evolution of information and discussions, providing complete context.
* **Identify User Contributions:** You can see who said what, which helps with accountability and tracking the source of each idea.
* **Explore Data Drill-Downs:** The detailed view provides clickable links to associated data, allowing direct access and deeper examination of underlying metrics and complete datasets relevant to the specific conversation.
 ## Share vetted answers from the chat
The Chat Log also allows you to open your past chat windows and share these interactions with other users or your entire organization. This ensures that valuable, vetted responses are easily disseminated and accessible.
Follow these steps to share vetted answers from the Chat Log:
1. Access the **Chat Log**, choose an **interaction** from the list, and click on **View Details**.
2. Locate and click on the specific **chat entry** that contains the vetted answer you wish to share. This action opens a detailed view of that particular data from the conversation.
## Share vetted answers from the chat
The Chat Log also allows you to open your past chat windows and share these interactions with other users or your entire organization. This ensures that valuable, vetted responses are easily disseminated and accessible.
Follow these steps to share vetted answers from the Chat Log:
1. Access the **Chat Log**, choose an **interaction** from the list, and click on **View Details**.
2. Locate and click on the specific **chat entry** that contains the vetted answer you wish to share. This action opens a detailed view of that particular data from the conversation.
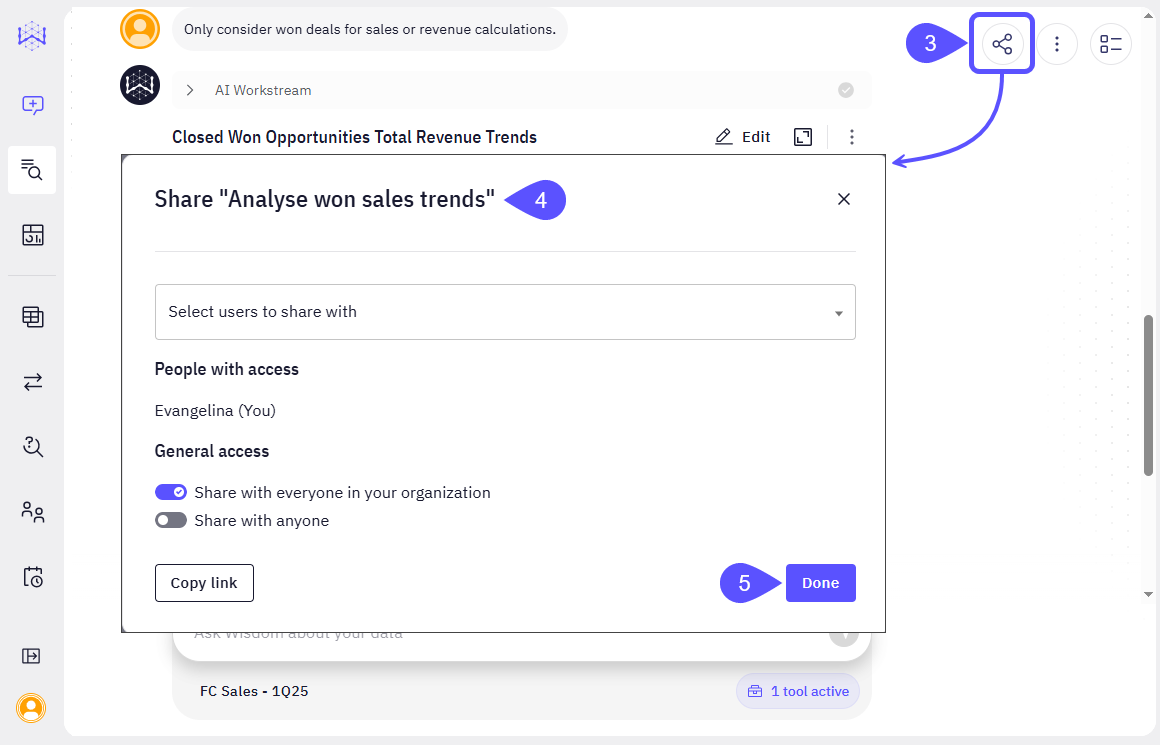
 3. Within the detailed chat view, locate and click on the **Share icon** (represented by three connected dots) in the top right corner of the chat window.
4. A Share-chat modal will appear, allowing you to configure who can access the shared content. Configure **Sharing Permissions**:
* Click the **Select users to share with** dropdown menu.
* **Type** the **name**(s) of individual users you want to share with and **select** them from the list.
* Currently, your name may be listed as having access, indicating that you are the owner or creator of this chat.
* **Share with everyone in your organization:** Toggle this switch to allow all members of your organization to view the chat.
* **Share with anyone:** Toggle this switch to generate a public link that can be accessed by anyone, regardless of whether they are in your organization. Use this option with caution for sensitive information. Obtain a direct **link** to the shared chat by clicking the **Copy link button**. This copies the URL to your clipboard, which you can then paste into emails, messages, or documents.
5. Once you have configured the desired sharing permissions, click **Done** to share the chat with the selected audience.
3. Within the detailed chat view, locate and click on the **Share icon** (represented by three connected dots) in the top right corner of the chat window.
4. A Share-chat modal will appear, allowing you to configure who can access the shared content. Configure **Sharing Permissions**:
* Click the **Select users to share with** dropdown menu.
* **Type** the **name**(s) of individual users you want to share with and **select** them from the list.
* Currently, your name may be listed as having access, indicating that you are the owner or creator of this chat.
* **Share with everyone in your organization:** Toggle this switch to allow all members of your organization to view the chat.
* **Share with anyone:** Toggle this switch to generate a public link that can be accessed by anyone, regardless of whether they are in your organization. Use this option with caution for sensitive information. Obtain a direct **link** to the shared chat by clicking the **Copy link button**. This copies the URL to your clipboard, which you can then paste into emails, messages, or documents.
5. Once you have configured the desired sharing permissions, click **Done** to share the chat with the selected audience.
 ## Next steps
Define relationships and context in your data to enable more powerful analysis.
Understand the methods for verifying the correctness and reliability of generated answers.
Learn how to rate answers and provide corrections to improve the system's accuracy.
Compile key insights and visualizations into a shareable, narrative-driven report.
Improve analysis by providing custom business definitions, synonyms, and other contextual information.
## Next steps
Define relationships and context in your data to enable more powerful analysis.
Understand the methods for verifying the correctness and reliability of generated answers.
Learn how to rate answers and provide corrections to improve the system's accuracy.
Compile key insights and visualizations into a shareable, narrative-driven report.
Improve analysis by providing custom business definitions, synonyms, and other contextual information.