> ## Documentation Index
> Fetch the complete documentation index at: https://docs.wisdom.ai/llms.txt
> Use this file to discover all available pages before exploring further.
# How to Configure Row-Level Security
This guide walks you through how to configure Row-Level Security (RLS) filters in WisdomAI to control which rows of data users can access. You’ll learn how to set up filters using natural language or SQL, preview results, and manage RLS settings after configuration.
If you are new to RLS, start with the conceptual guide: [**Understanding Row-Level Security**](/manage-account/row-level-access-control/understanding-row-level-security).
## Prerequisites
Before configuring RLS, make sure you have the following:
* **Admin Access:** You must have administrator privileges for your WisdomAI domain.
* **A Target Table:** Identify the table you wish to secure and understand its schema.
* **(Optional) Dynamic Filtering Setup:** For dynamic RLS, you should have one of the following configured:
* **User Attributes:** Key-value pairs assigned to users that define their permissions (e.g., `tenantId: 'abc-123'`). Attributes can be set manually by an admin or provisioned automatically via SAML SSO.
* **Entitlements Table:** A dedicated table that maps users to the specific data resources they are allowed to access.
## Configure RLS on a table
Once your setup is ready, follow these steps to configure row-level security for a table in your WisdomAI domain.
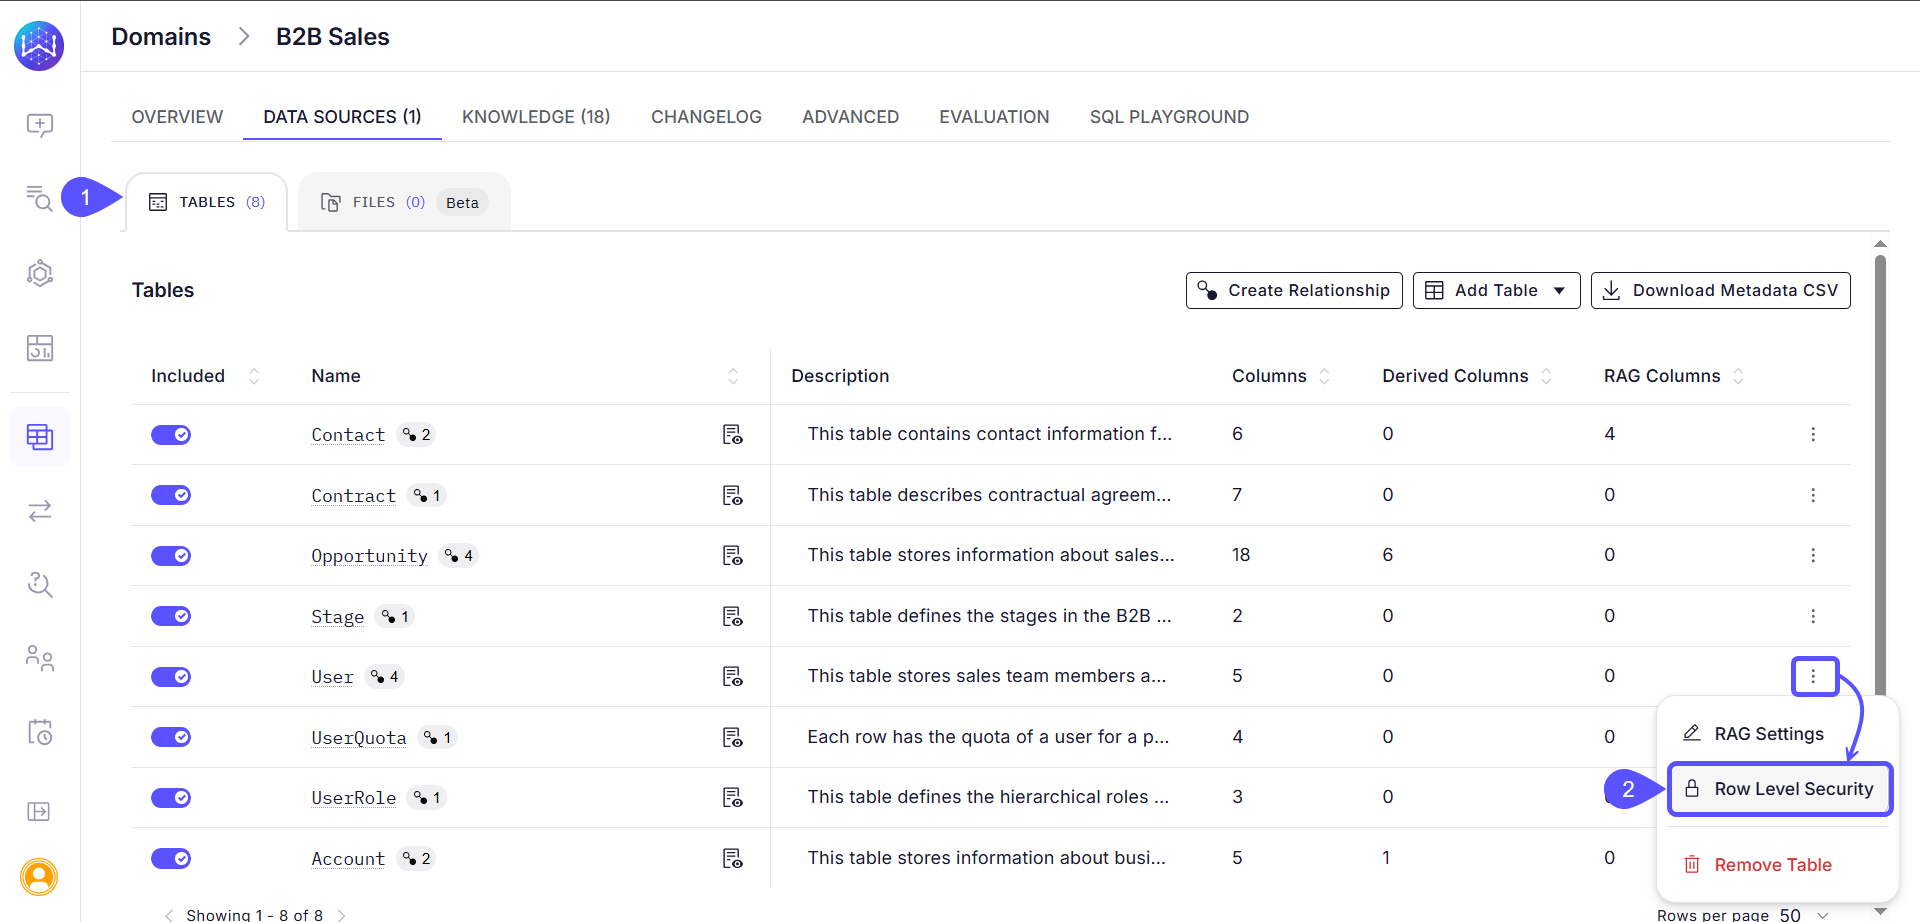
1. In your WisdomAI domain, navigate to **Data** > **Tables**.
2. Locate the table you want to secure, click the three-dot menu on the right side of the table row and select **Row-Level Security**. The **Row-Level Security Configuration** window will open.
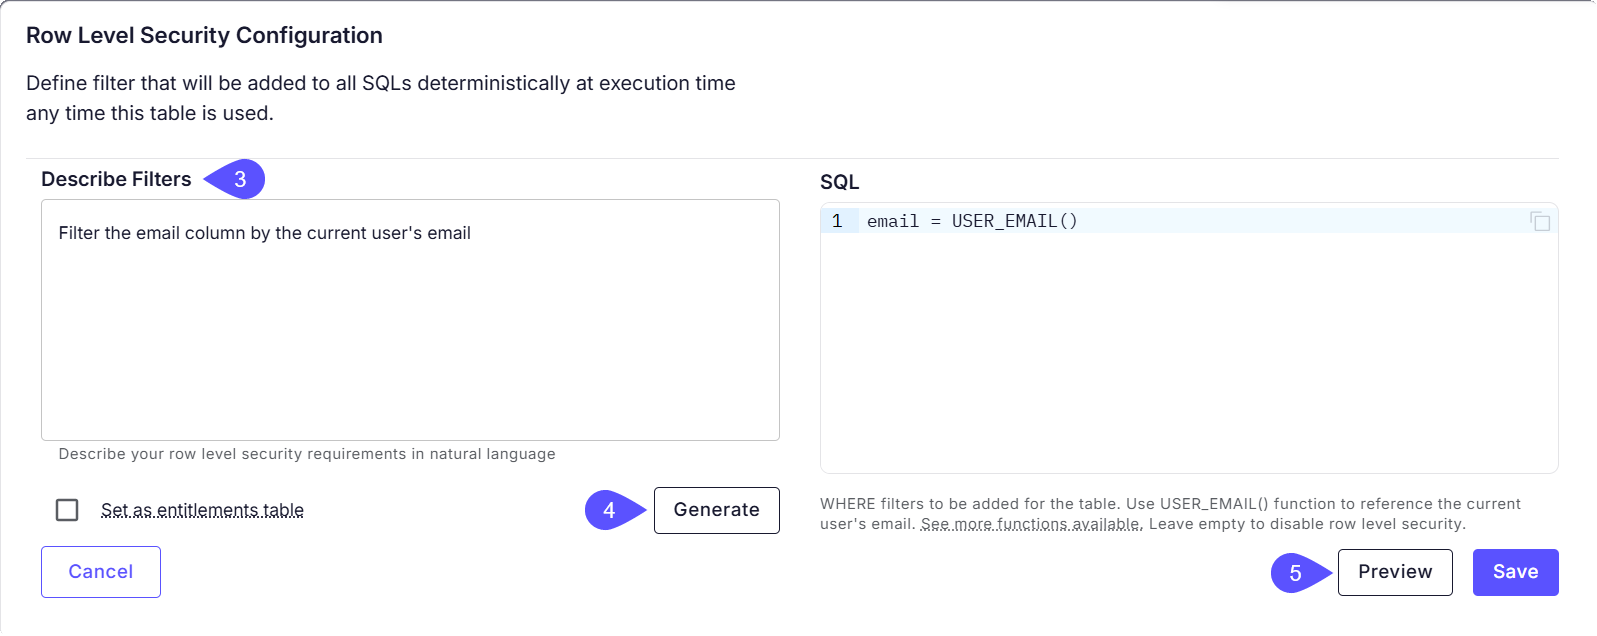
 RLS filters are defined as `WHERE` clauses that WisdomAI applies to every query on the table. You can define this filter using natural language (recommended) or by writing SQL directly.
3. Use the **Describe Filters** text box to explain your access rule in plain language.
4. Click **Generate**. WisdomAI will automatically generate a valid SQL `WHERE` clause based on your description, recognizing table columns, user attributes, and entitlements. Here are some examples to help you describe a filter:
| You Type | WisdomAI Generates |
| -------------------------------------------------------------- | --------------------------------------- |
| `Filter the email column by the current user's email` | `email = USER_EMAIL()` |
| `Match the tenantId column with the user's tenantId attribute` | `tenantId = USER_ATTRIBUTE('tenantId')` |
| `Use the entitlements table to filter the territory name` | SQL subquery (see below) |
```
EXISTS (
SELECT 1
FROM entitlements
WHERE user_email = USER_EMAIL()
AND resource_type = 'Territory'
AND (resource_value = '*' OR resource_value = territory.name)
)
```
For complex or highly specific rules, you can write the `WHERE` clause directly in the **SQL** text box in a valid SQL syntax. For this, you can use WisdomAI's built-in functions for dynamic filtering.
For a complete list of functions, see [Dynamic Filters with Custom Functions](/manage-account/row-level-access-control/understanding-row-level-security#dynamic-filters-with-custom-functions).
RLS filters are defined as `WHERE` clauses that WisdomAI applies to every query on the table. You can define this filter using natural language (recommended) or by writing SQL directly.
3. Use the **Describe Filters** text box to explain your access rule in plain language.
4. Click **Generate**. WisdomAI will automatically generate a valid SQL `WHERE` clause based on your description, recognizing table columns, user attributes, and entitlements. Here are some examples to help you describe a filter:
| You Type | WisdomAI Generates |
| -------------------------------------------------------------- | --------------------------------------- |
| `Filter the email column by the current user's email` | `email = USER_EMAIL()` |
| `Match the tenantId column with the user's tenantId attribute` | `tenantId = USER_ATTRIBUTE('tenantId')` |
| `Use the entitlements table to filter the territory name` | SQL subquery (see below) |
```
EXISTS (
SELECT 1
FROM entitlements
WHERE user_email = USER_EMAIL()
AND resource_type = 'Territory'
AND (resource_value = '*' OR resource_value = territory.name)
)
```
For complex or highly specific rules, you can write the `WHERE` clause directly in the **SQL** text box in a valid SQL syntax. For this, you can use WisdomAI's built-in functions for dynamic filtering.
For a complete list of functions, see [Dynamic Filters with Custom Functions](/manage-account/row-level-access-control/understanding-row-level-security#dynamic-filters-with-custom-functions).
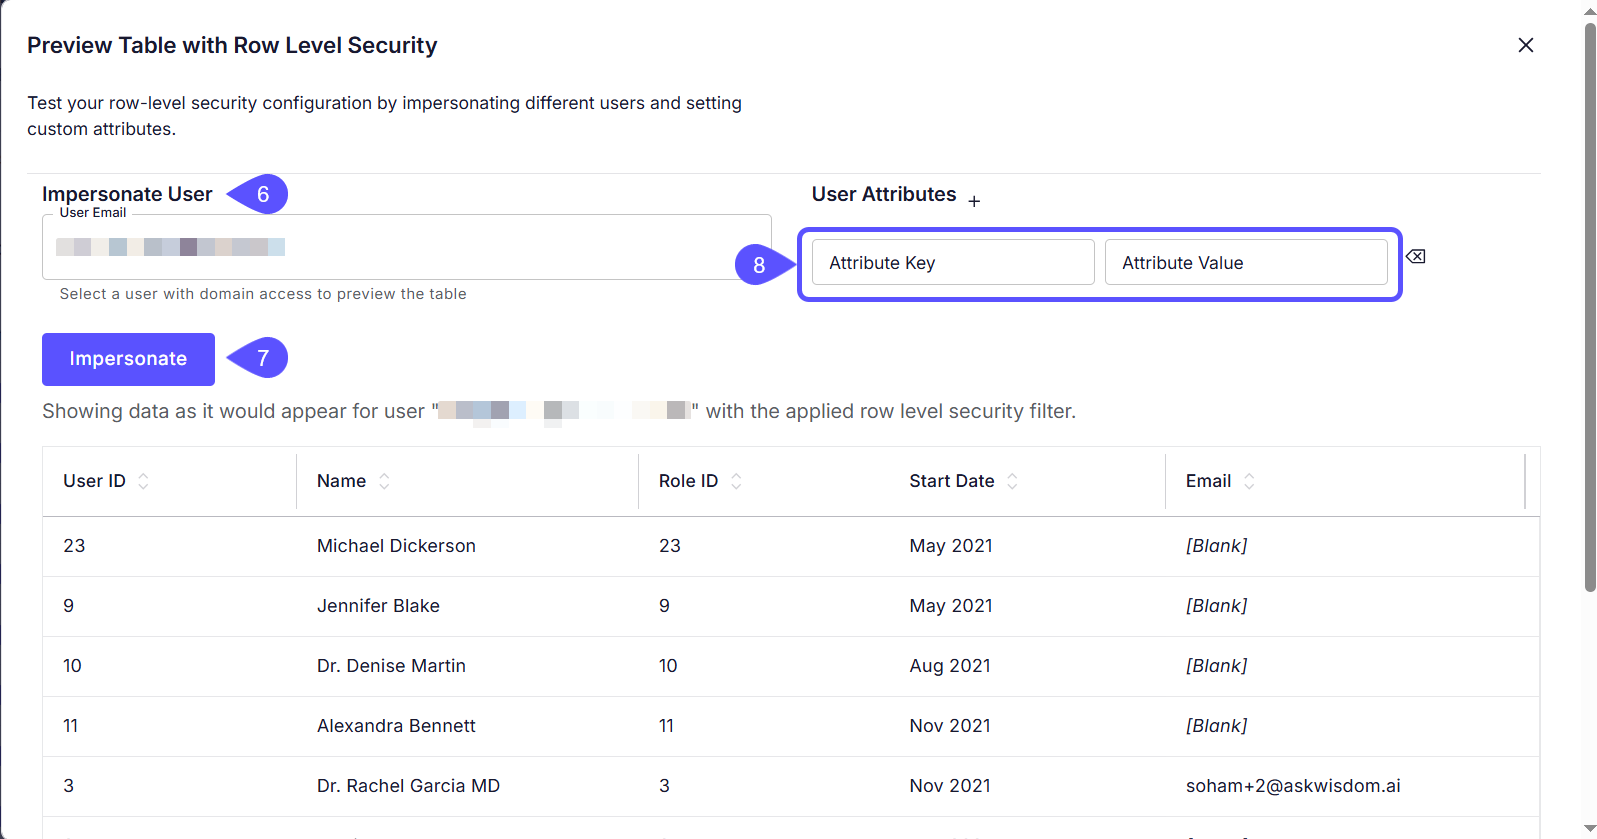
 5. Click **Preview**.
6. In the **Preview Table with Row-Level Security** window that opens, locate the **Impersonate User** field and enter a user's email address.
7. Click **Impersonate**. The data preview will update to show exactly what that user would see.
8. (Optional) Add temporary user attributes to test different scenarios.
9. Repeat with different users to validate all access cases.
5. Click **Preview**.
6. In the **Preview Table with Row-Level Security** window that opens, locate the **Impersonate User** field and enter a user's email address.
7. Click **Impersonate**. The data preview will update to show exactly what that user would see.
8. (Optional) Add temporary user attributes to test different scenarios.
9. Repeat with different users to validate all access cases.
 10. Once you have verified that the filter works correctly, close the **Preview Table with Row-Level Security** window and click **Save** to apply the RLS rule. The filter is now active and will be automatically appended to all queries against this table for non-admin users.
## Managing RLS
* **To Disable RLS:** Open the RLS configuration, clear the contents of the **SQL** text box, and click **Save**.
* **Applying RLS to Admin Users:** By default, admins can see all data. To apply RLS filters to admins as well, enable the corresponding setting in your domain's **Settings** > **Advanced** tab.
* **Using a Table as an Entitlements Source:** If the table you are securing is itself an entitlements table, check the **Set as entitlements table** option. This optimizes how WisdomAI uses it for RLS checks on other tables.
## Next steps
Manage user roles, permissions, and access to the platform.
Explore the full list of databases and platforms you can connect to the system.
Understand the core concepts and architecture behind the platform's data analysis capabilities.
Walk through the initial setup to connect a data source and run your first query.
10. Once you have verified that the filter works correctly, close the **Preview Table with Row-Level Security** window and click **Save** to apply the RLS rule. The filter is now active and will be automatically appended to all queries against this table for non-admin users.
## Managing RLS
* **To Disable RLS:** Open the RLS configuration, clear the contents of the **SQL** text box, and click **Save**.
* **Applying RLS to Admin Users:** By default, admins can see all data. To apply RLS filters to admins as well, enable the corresponding setting in your domain's **Settings** > **Advanced** tab.
* **Using a Table as an Entitlements Source:** If the table you are securing is itself an entitlements table, check the **Set as entitlements table** option. This optimizes how WisdomAI uses it for RLS checks on other tables.
## Next steps
Manage user roles, permissions, and access to the platform.
Explore the full list of databases and platforms you can connect to the system.
Understand the core concepts and architecture behind the platform's data analysis capabilities.
Walk through the initial setup to connect a data source and run your first query.