> ## Documentation Index
> Fetch the complete documentation index at: https://docs.wisdom.ai/llms.txt
> Use this file to discover all available pages before exploring further.
# SharePoint
WisdomAI supports connecting to Microsoft SharePoint as an unstructured data source. The SharePoint connector crawls files from your SharePoint sites and enables multi-site ingestion of diverse file formats, including PDFs, spreadsheets, and images, while providing granular filtering to ensure that only new or modified content is processed after the initial crawl.
## Get started
Before you begin, ensure you have the following:
* **SharePoint Online:** The connector works with SharePoint Online (part of Microsoft 365). On-premises SharePoint Server is not supported.
* **SharePoint Site URLs:** The full URLs of the sites you want to connect (e.g., `https://contoso.sharepoint.com/sites/teamsite`).
* **Azure AD permissions**: The connector requires the following Microsoft Graph API application permissions granted on your Azure AD tenant:
* `Sites.Read.All`: Read items in all site collections.
* `Files.Read.All`: Read all files that the app has access to.
* **Authentication Methods:** You must have one of the authentication methods configured:
* An Azure AD app registration with a client secret (Service Principal).
* Your Azure AD Tenant ID for the WisdomAI-managed app (Dedicated Multitenant App).
## Authentication methods
Choose the authentication method that best fits your organization's security requirements.
Use your own Azure AD app registration to authenticate. This gives you full control over the app and its permissions.
1. In the [**Azure Portal**](https://portal.azure.com), navigate to **Azure Active Directory** > **App registrations** > **New registration**.
2. Register a new application (e.g., "WisdomAI SharePoint Connector").
3. Note the **Application (client) ID** and **Directory (tenant) ID** from the **Overview** page.
4. Navigate to **Certificates & secrets** > **New client secret**.
5. Create a secret and copy the **Value** immediately; it will not be shown again.
6. Navigate to **API permissions** > **Add a permission** > **Microsoft Graph** > **Application permissions**.
7. Add the following permissions:
* `Sites.Read.All`
* `Files.Read.All`
8. Click **Grant admin consent** to approve the permissions for your tenant.
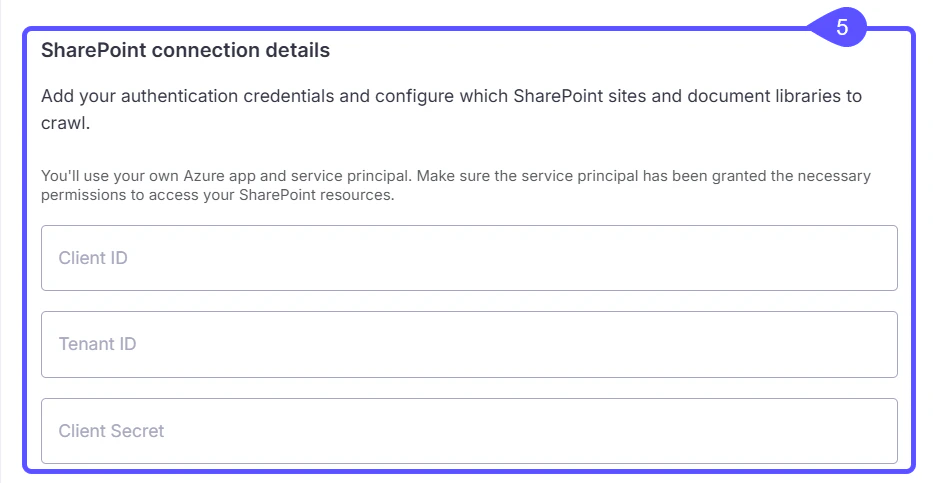
You will need the following values when configuring the connection in WisdomAI:
| Field | Description |
| :------------ | :----------------------------------------------------- |
| Client ID | The Application (client) ID from your app registration |
| Tenant ID | The Directory (tenant) ID of your Azure AD tenant |
| Client Secret | The client secret value you generated |
WisdomAI creates and manages the Azure AD app on your behalf. You only need to provide your Tenant ID and grant admin consent.
1. Locate your **Azure AD Tenant ID** in the [Azure Portal](https://portal.azure.com) under **Azure Active Directory** > **Overview**.
2. During the WisdomAI connection setup, enter your **Tenant ID**.
3. Click **Grant Admin Consent** when prompted.
4. A Microsoft consent dialog will open. You must approve the permissions (`Sites.Read.All` and `Files.Read.All`) for the WisdomAI-managed app.
5. The status in WisdomAI will update to **Granted** once approved.
Granting admin consent for these permissions requires a user with the **Global Administrator** or **Privileged Role Administrator** role in your Azure AD tenant.
***
## Setting up the connection
Follow these steps to establish the connection within WisdomAI:
1. Navigate to the **Overview** tab in your WisdomAI domain and click **Add Data Source**.
2. Select **Connect another source** from the **Add** **Data Source** selector and click **Add Data Source**.
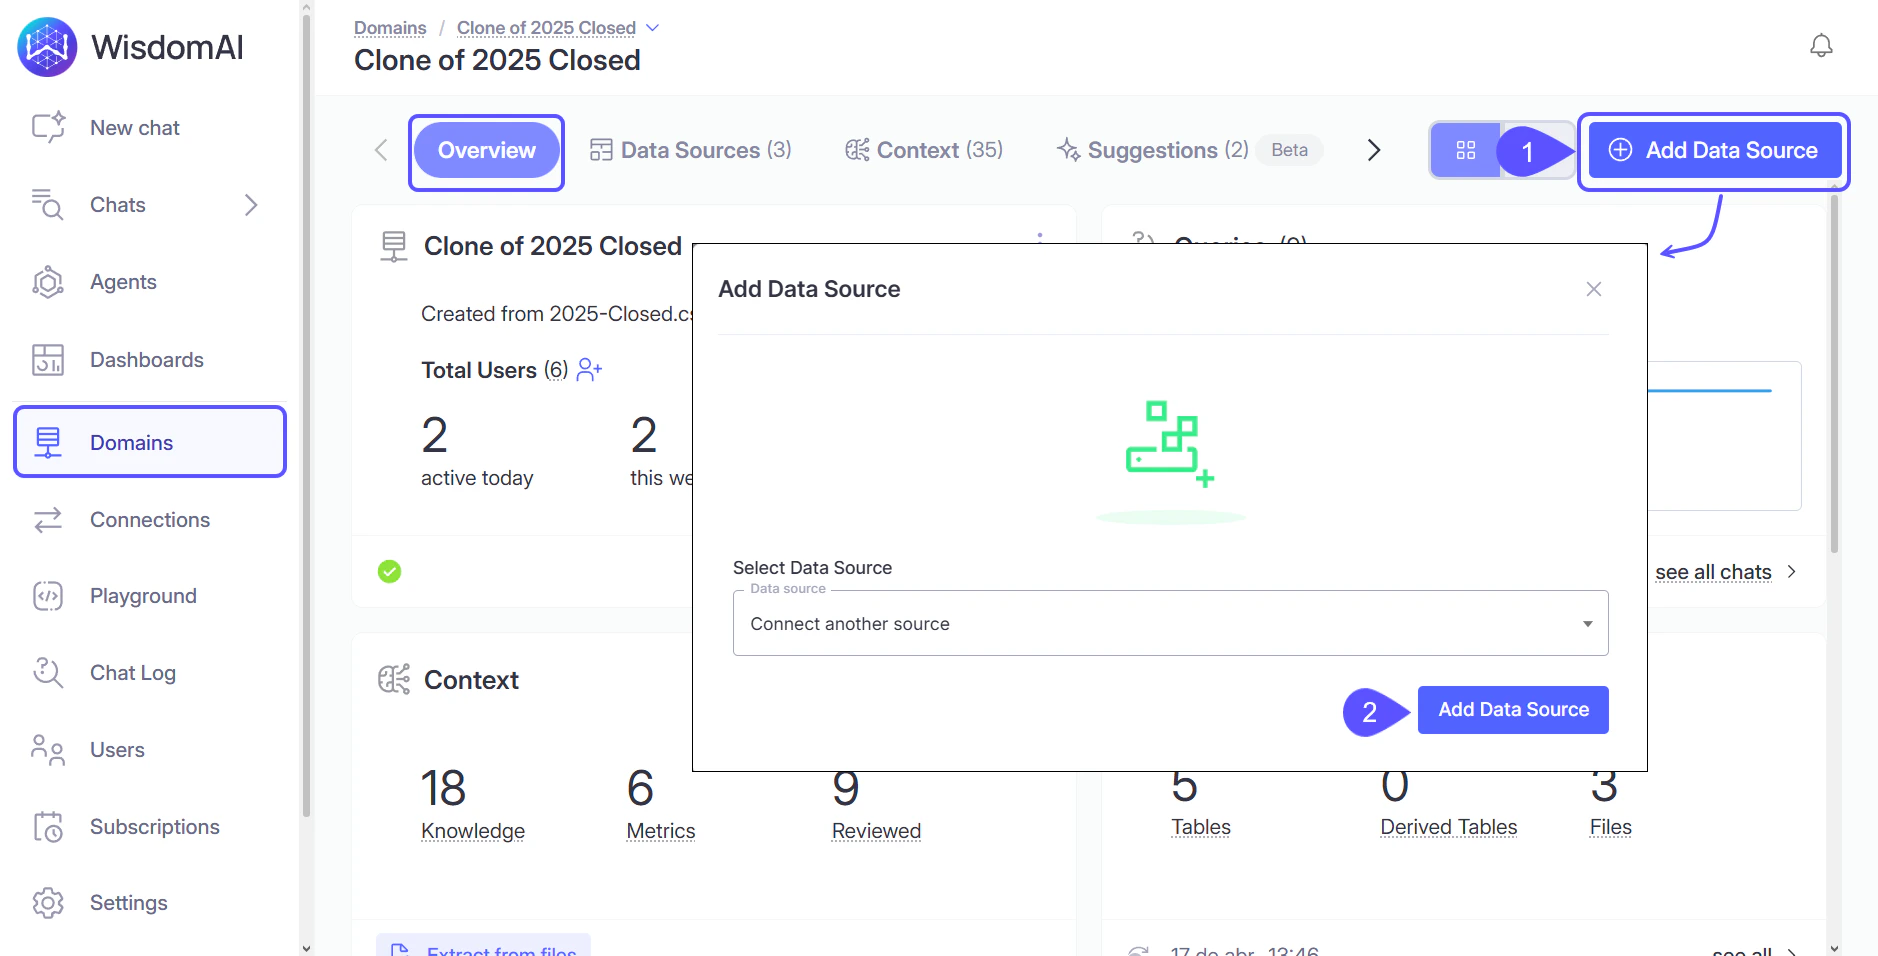 3. Select **Connect to Data store or MCP server**.
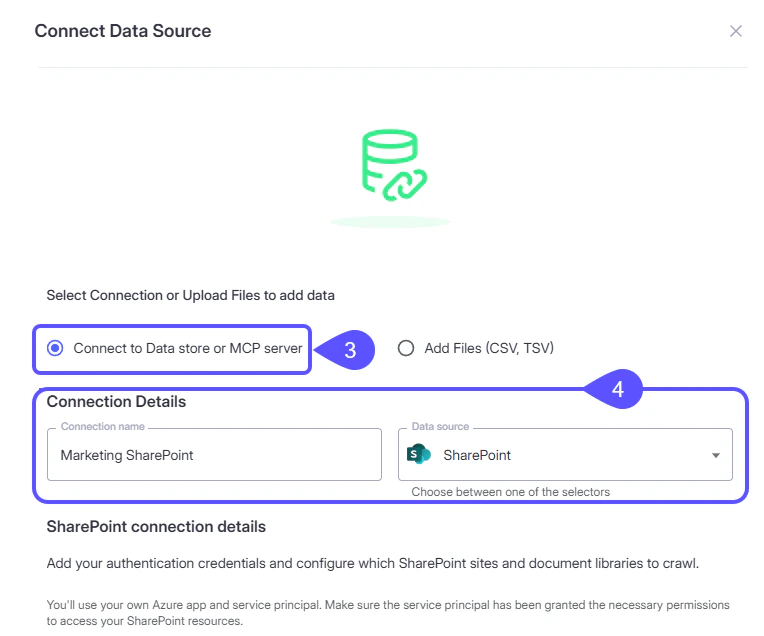
4. Enter a descriptive **Connection name** (e.g., "Marketing SharePoint") and select **SharePoint** as the data source.
3. Select **Connect to Data store or MCP server**.
4. Enter a descriptive **Connection name** (e.g., "Marketing SharePoint") and select **SharePoint** as the data source.
 5. **Configure Authentication:** Choose your preferred method (Service Principal or Dedicated Multitenant App) and enter the required credentials.
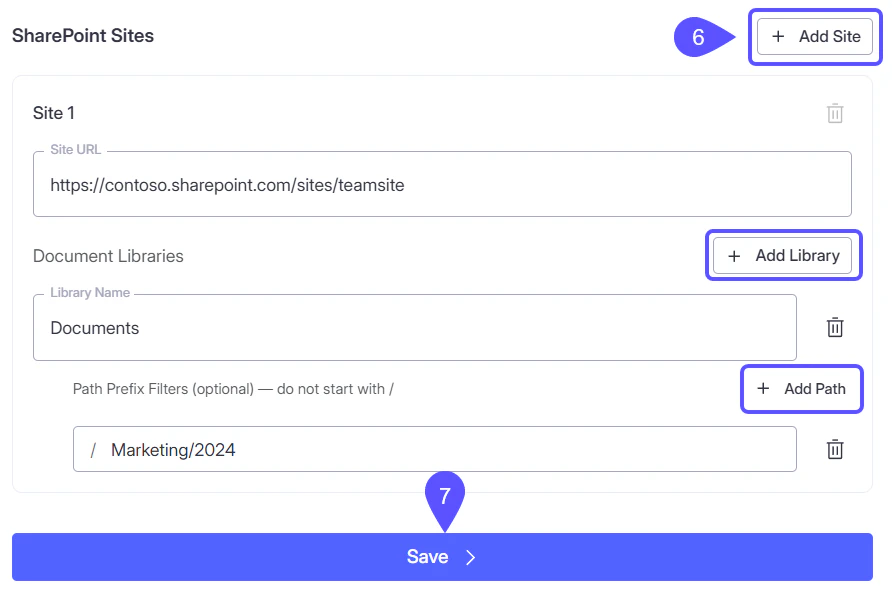
 6. **Configure SharePoint Sites:**
* Click **Add Site** and enter the full **Site URL** (e.g., `https://contoso.sharepoint.com/sites/teamsite`).
You can add multiple sites to a single connection.
* (Optional) Click **Add Library** to restrict crawling to specific document libraries. If left blank, all libraries on the site are crawled.
* (Optional) Click **Add Path** to restrict crawling to specific folders within a library. Enter the path prefix (e.g., `Marketing/2024`) without a leading `/`.
7. Click **Save**. WisdomAI will validate the credentials before saving.
6. **Configure SharePoint Sites:**
* Click **Add Site** and enter the full **Site URL** (e.g., `https://contoso.sharepoint.com/sites/teamsite`).
You can add multiple sites to a single connection.
* (Optional) Click **Add Library** to restrict crawling to specific document libraries. If left blank, all libraries on the site are crawled.
* (Optional) Click **Add Path** to restrict crawling to specific folders within a library. Enter the path prefix (e.g., `Marketing/2024`) without a leading `/`.
7. Click **Save**. WisdomAI will validate the credentials before saving.
 8. After the connection is created, add it as a data source to your domain. WisdomAI will begin crawling the configured SharePoint sites.
## Configuration reference
This section details the parameters used to define the scope of your data connection.
### Sites
Each connection can include one or more SharePoint sites. At least one site is required.
| Field | Required | Description |
| :--------------------- | :------- | :------------------------------------------------------------------------------------------- |
| **Site URL** | Yes | The full URL of the SharePoint site (e.g., `https://contoso.sharepoint.com/sites/teamsite`). |
| **Document Libraries** | No | Optionally restrict which document libraries within the site are crawled. |
### Document libraries
Within each site, you can optionally specify which document libraries to crawl. If none are specified, all document libraries in the site are included.
| Field | Required | Description |
| :---------------------- | :------- | :---------------------------------------------------------------- |
| **Library Name** | Yes | The name of the document library (e.g., `Documents`). |
| **Path Prefix Filters** | No | Optionally restrict which folders within the library are crawled. |
### Path prefix filters
Within each document library, you can optionally specify folder path prefixes to scope the crawl. If none are specified, all files in the library are included.
* **Formatting:** Do **not** include a leading `/`. Use `Reports/Q1`, not `/Reports/Q1`.
* **Case-Sensitivity:** Filters are case-insensitive (e.g., `Marketing` matches `MARKETING`).
* **Matching:** Filters match on prefix. `Marketing` will match `Marketing/file.pdf` and `Marketing/2024/report.pdf`.
* **Multiple Filters:** You can add multiple filters per library. A file is included if it matches **any** configured filter.
**Example configuration**:
```txt theme={null}
Site:
Library: Shared Documents
Path Filter: Campaigns/2024
Path Filter: Brand Guidelines
Library: Reports
(no path filters — all files in this library are crawled)
```
## Troubleshooting
* Verify that the **Client ID**, **Tenant ID**, and **Client Secret** are correct and have not expired.
* For the Dedicated Multitenant App method, confirm that admin consent has been granted (the status should show "Granted" in WisdomAI).
* Confirm the Site URL is correct and accessible. Ensure the **Site URL** points to a specific site, not the root SharePoint domain.
* Verify the **Library Name** matches the SharePoint library exactly.
* If using path prefix filters, verify the paths exist and do not start with `/`.
* Ensure the Azure AD app's permissions (`Sites.Read.All`, `Files.Read.All`) have been granted admin consent.
* The app may authenticate successfully but lack access to certain sites. Verify that your Azure AD app permissions are tenant-wide (admin-consented), not scoped to specific sites only.
* The user granting consent must have the **Global Administrator** or **Privileged Role Administrator** role in Azure AD.
* If your organization restricts app consent, contact your Azure AD administrator.
## Next steps
Learn how to connect WisdomAI to GoogleSheets.
Learn how to connect WisdomAI to Slack.
8. After the connection is created, add it as a data source to your domain. WisdomAI will begin crawling the configured SharePoint sites.
## Configuration reference
This section details the parameters used to define the scope of your data connection.
### Sites
Each connection can include one or more SharePoint sites. At least one site is required.
| Field | Required | Description |
| :--------------------- | :------- | :------------------------------------------------------------------------------------------- |
| **Site URL** | Yes | The full URL of the SharePoint site (e.g., `https://contoso.sharepoint.com/sites/teamsite`). |
| **Document Libraries** | No | Optionally restrict which document libraries within the site are crawled. |
### Document libraries
Within each site, you can optionally specify which document libraries to crawl. If none are specified, all document libraries in the site are included.
| Field | Required | Description |
| :---------------------- | :------- | :---------------------------------------------------------------- |
| **Library Name** | Yes | The name of the document library (e.g., `Documents`). |
| **Path Prefix Filters** | No | Optionally restrict which folders within the library are crawled. |
### Path prefix filters
Within each document library, you can optionally specify folder path prefixes to scope the crawl. If none are specified, all files in the library are included.
* **Formatting:** Do **not** include a leading `/`. Use `Reports/Q1`, not `/Reports/Q1`.
* **Case-Sensitivity:** Filters are case-insensitive (e.g., `Marketing` matches `MARKETING`).
* **Matching:** Filters match on prefix. `Marketing` will match `Marketing/file.pdf` and `Marketing/2024/report.pdf`.
* **Multiple Filters:** You can add multiple filters per library. A file is included if it matches **any** configured filter.
**Example configuration**:
```txt theme={null}
Site:
Library: Shared Documents
Path Filter: Campaigns/2024
Path Filter: Brand Guidelines
Library: Reports
(no path filters — all files in this library are crawled)
```
## Troubleshooting
* Verify that the **Client ID**, **Tenant ID**, and **Client Secret** are correct and have not expired.
* For the Dedicated Multitenant App method, confirm that admin consent has been granted (the status should show "Granted" in WisdomAI).
* Confirm the Site URL is correct and accessible. Ensure the **Site URL** points to a specific site, not the root SharePoint domain.
* Verify the **Library Name** matches the SharePoint library exactly.
* If using path prefix filters, verify the paths exist and do not start with `/`.
* Ensure the Azure AD app's permissions (`Sites.Read.All`, `Files.Read.All`) have been granted admin consent.
* The app may authenticate successfully but lack access to certain sites. Verify that your Azure AD app permissions are tenant-wide (admin-consented), not scoped to specific sites only.
* The user granting consent must have the **Global Administrator** or **Privileged Role Administrator** role in Azure AD.
* If your organization restricts app consent, contact your Azure AD administrator.
## Next steps
Learn how to connect WisdomAI to GoogleSheets.
Learn how to connect WisdomAI to Slack.