> ## Documentation Index
> Fetch the complete documentation index at: https://docs.wisdom.ai/llms.txt
> Use this file to discover all available pages before exploring further.
# Connect to Google BigQuery
WisdomAI connects to Google BigQuery using a service account for background operations such as metadata crawling. To run end-user queries, you can either continue using that same service account or enable Google OAuth so each user authenticates with their own Google account for finer-grained access control and per-user audit trails.
## Prerequisites
* A GCP service account created with the required BigQuery roles. See [Set up a GCP service account for WisdomAI](/getting-started/connect-data-sources/set-up-gcp-service-account).
* The JSON key file for that service account, downloaded to your computer.
* Your Google Cloud project ID, available on the GCP Console dashboard.
## Create the connection
These steps create the connection in WisdomAI and authenticate the service account. Complete them whether you plan to use service account authentication only or enable OAuth on top.
1. In WisdomAI, go to **Connections** and click **Add Connection**.
2. Select **BigQuery** as the data source type.
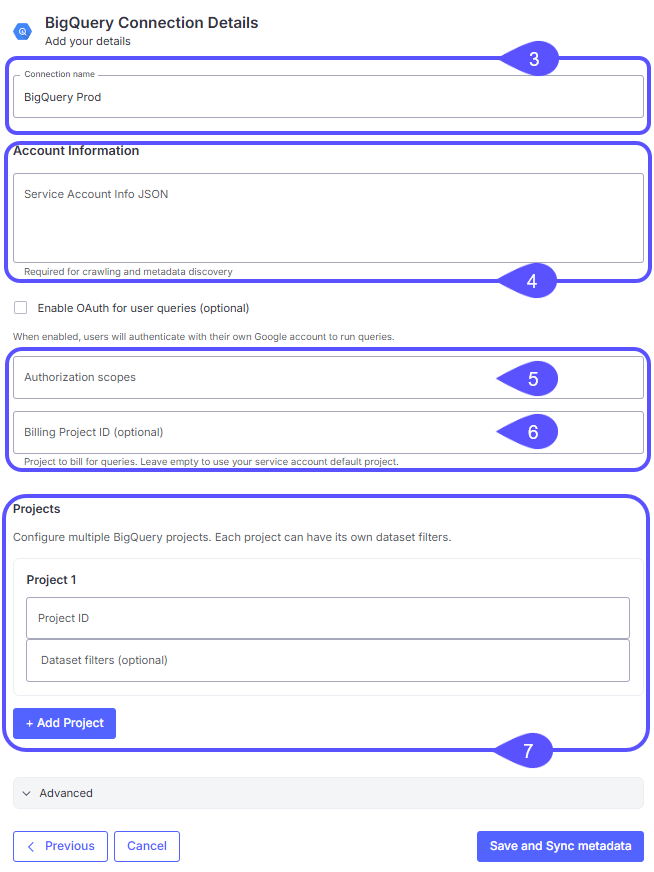
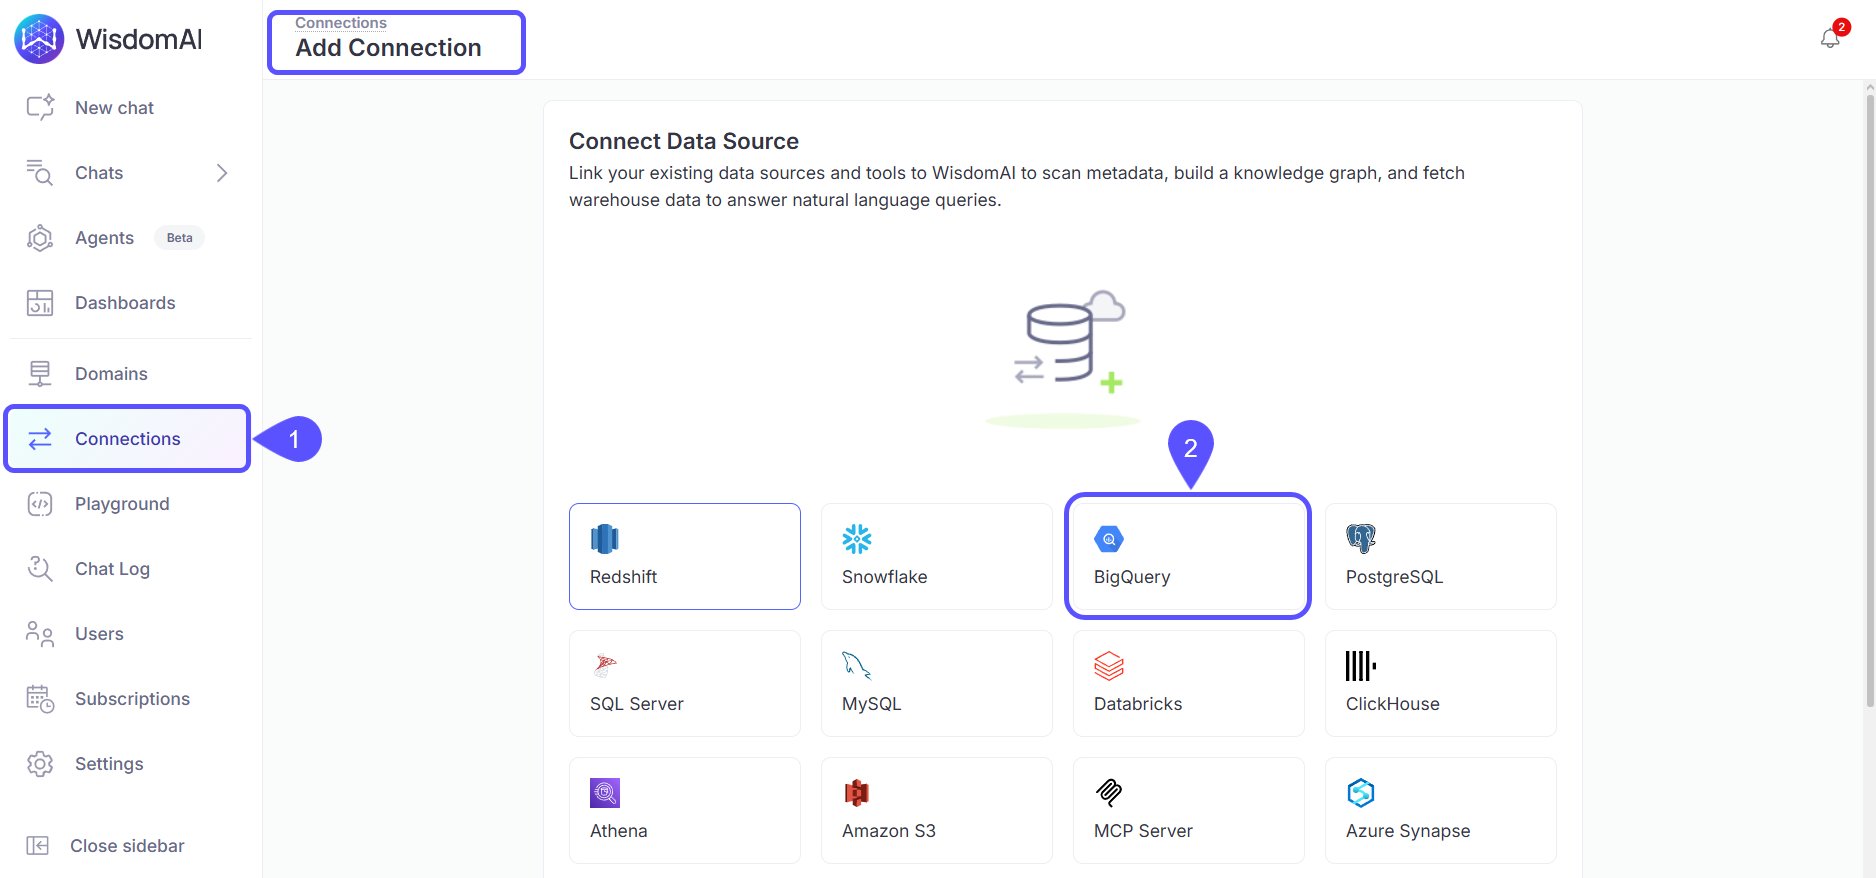 3. Enter a **Connection name**, for example `BigQuery Prod`.
4. Under **Account Information**, paste the contents of your service account JSON into **Service Account Info JSON**.
This field is required for crawling and metadata discovery.
5. (**Optional**) Enter **Authorization scopes** to restrict the OAuth permission scopes granted to the connection.
6. (**Optional**) Enter a **Billing Project ID** to specify which project to bill for queries. Leave this field empty to use your service account's default project.
7. Under **Projects**, configure at least one BigQuery project:
* In the **Project 1** card, enter your Google Cloud **Project ID**.
* (**Optional**) Enter **Dataset filters** to restrict which datasets WisdomAI crawls for that project.
* To connect additional projects, click **+ Add Project** and repeat these sub-steps for each one.
3. Enter a **Connection name**, for example `BigQuery Prod`.
4. Under **Account Information**, paste the contents of your service account JSON into **Service Account Info JSON**.
This field is required for crawling and metadata discovery.
5. (**Optional**) Enter **Authorization scopes** to restrict the OAuth permission scopes granted to the connection.
6. (**Optional**) Enter a **Billing Project ID** to specify which project to bill for queries. Leave this field empty to use your service account's default project.
7. Under **Projects**, configure at least one BigQuery project:
* In the **Project 1** card, enter your Google Cloud **Project ID**.
* (**Optional**) Enter **Dataset filters** to restrict which datasets WisdomAI crawls for that project.
* To connect additional projects, click **+ Add Project** and repeat these sub-steps for each one.
 At this point, you have two options:
* To use the service account for all queries, click **Save and Sync metadata**. WisdomAI connects to BigQuery, scans metadata for the specified datasets and tables, and your connection is ready.
* To authenticate end-user queries with individual Google accounts, leave the form open and continue to the next section before saving.
## Enable OAuth for user queries
OAuth lets each WisdomAI user run BigQuery queries under their own Google identity. The service account still handles crawl jobs and metadata discovery in the background.
Enabling OAuth requires you to work across two systems. You will create an OAuth client in the Google Cloud Console, then return to WisdomAI to paste the credentials and authenticate.
### Start the OAuth setup in WisdomAI
Begin in the connection form you already filled out in the previous section.
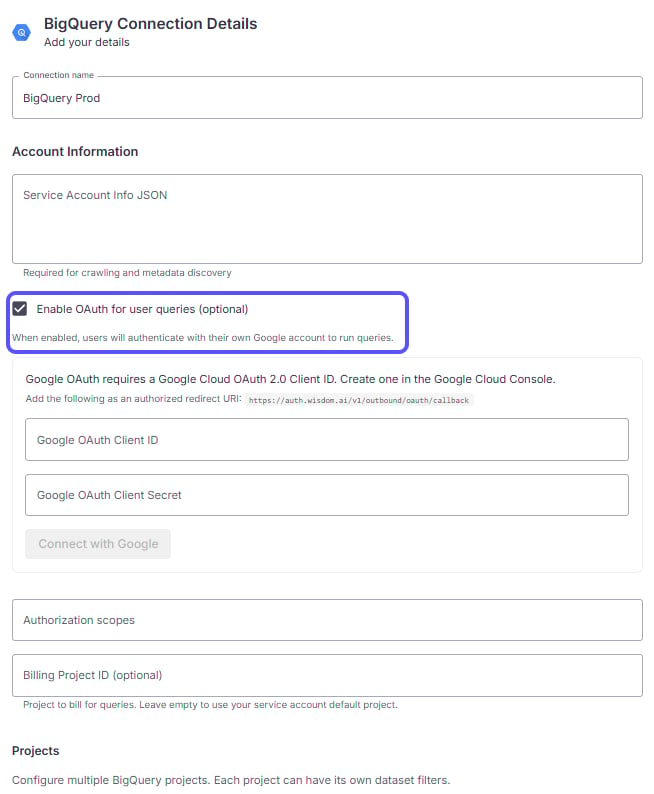
1. Select **Enable OAuth for user queries (optional)**. The **Google OAuth Client ID** and **Google OAuth Client Secret** fields appear.
2. Leave the form open. You will return here after creating the OAuth client in Google Cloud.
At this point, you have two options:
* To use the service account for all queries, click **Save and Sync metadata**. WisdomAI connects to BigQuery, scans metadata for the specified datasets and tables, and your connection is ready.
* To authenticate end-user queries with individual Google accounts, leave the form open and continue to the next section before saving.
## Enable OAuth for user queries
OAuth lets each WisdomAI user run BigQuery queries under their own Google identity. The service account still handles crawl jobs and metadata discovery in the background.
Enabling OAuth requires you to work across two systems. You will create an OAuth client in the Google Cloud Console, then return to WisdomAI to paste the credentials and authenticate.
### Start the OAuth setup in WisdomAI
Begin in the connection form you already filled out in the previous section.
1. Select **Enable OAuth for user queries (optional)**. The **Google OAuth Client ID** and **Google OAuth Client Secret** fields appear.
2. Leave the form open. You will return here after creating the OAuth client in Google Cloud.
 ### Create an OAuth client in Google Cloud
The OAuth client lets WisdomAI request access tokens on behalf of your users.
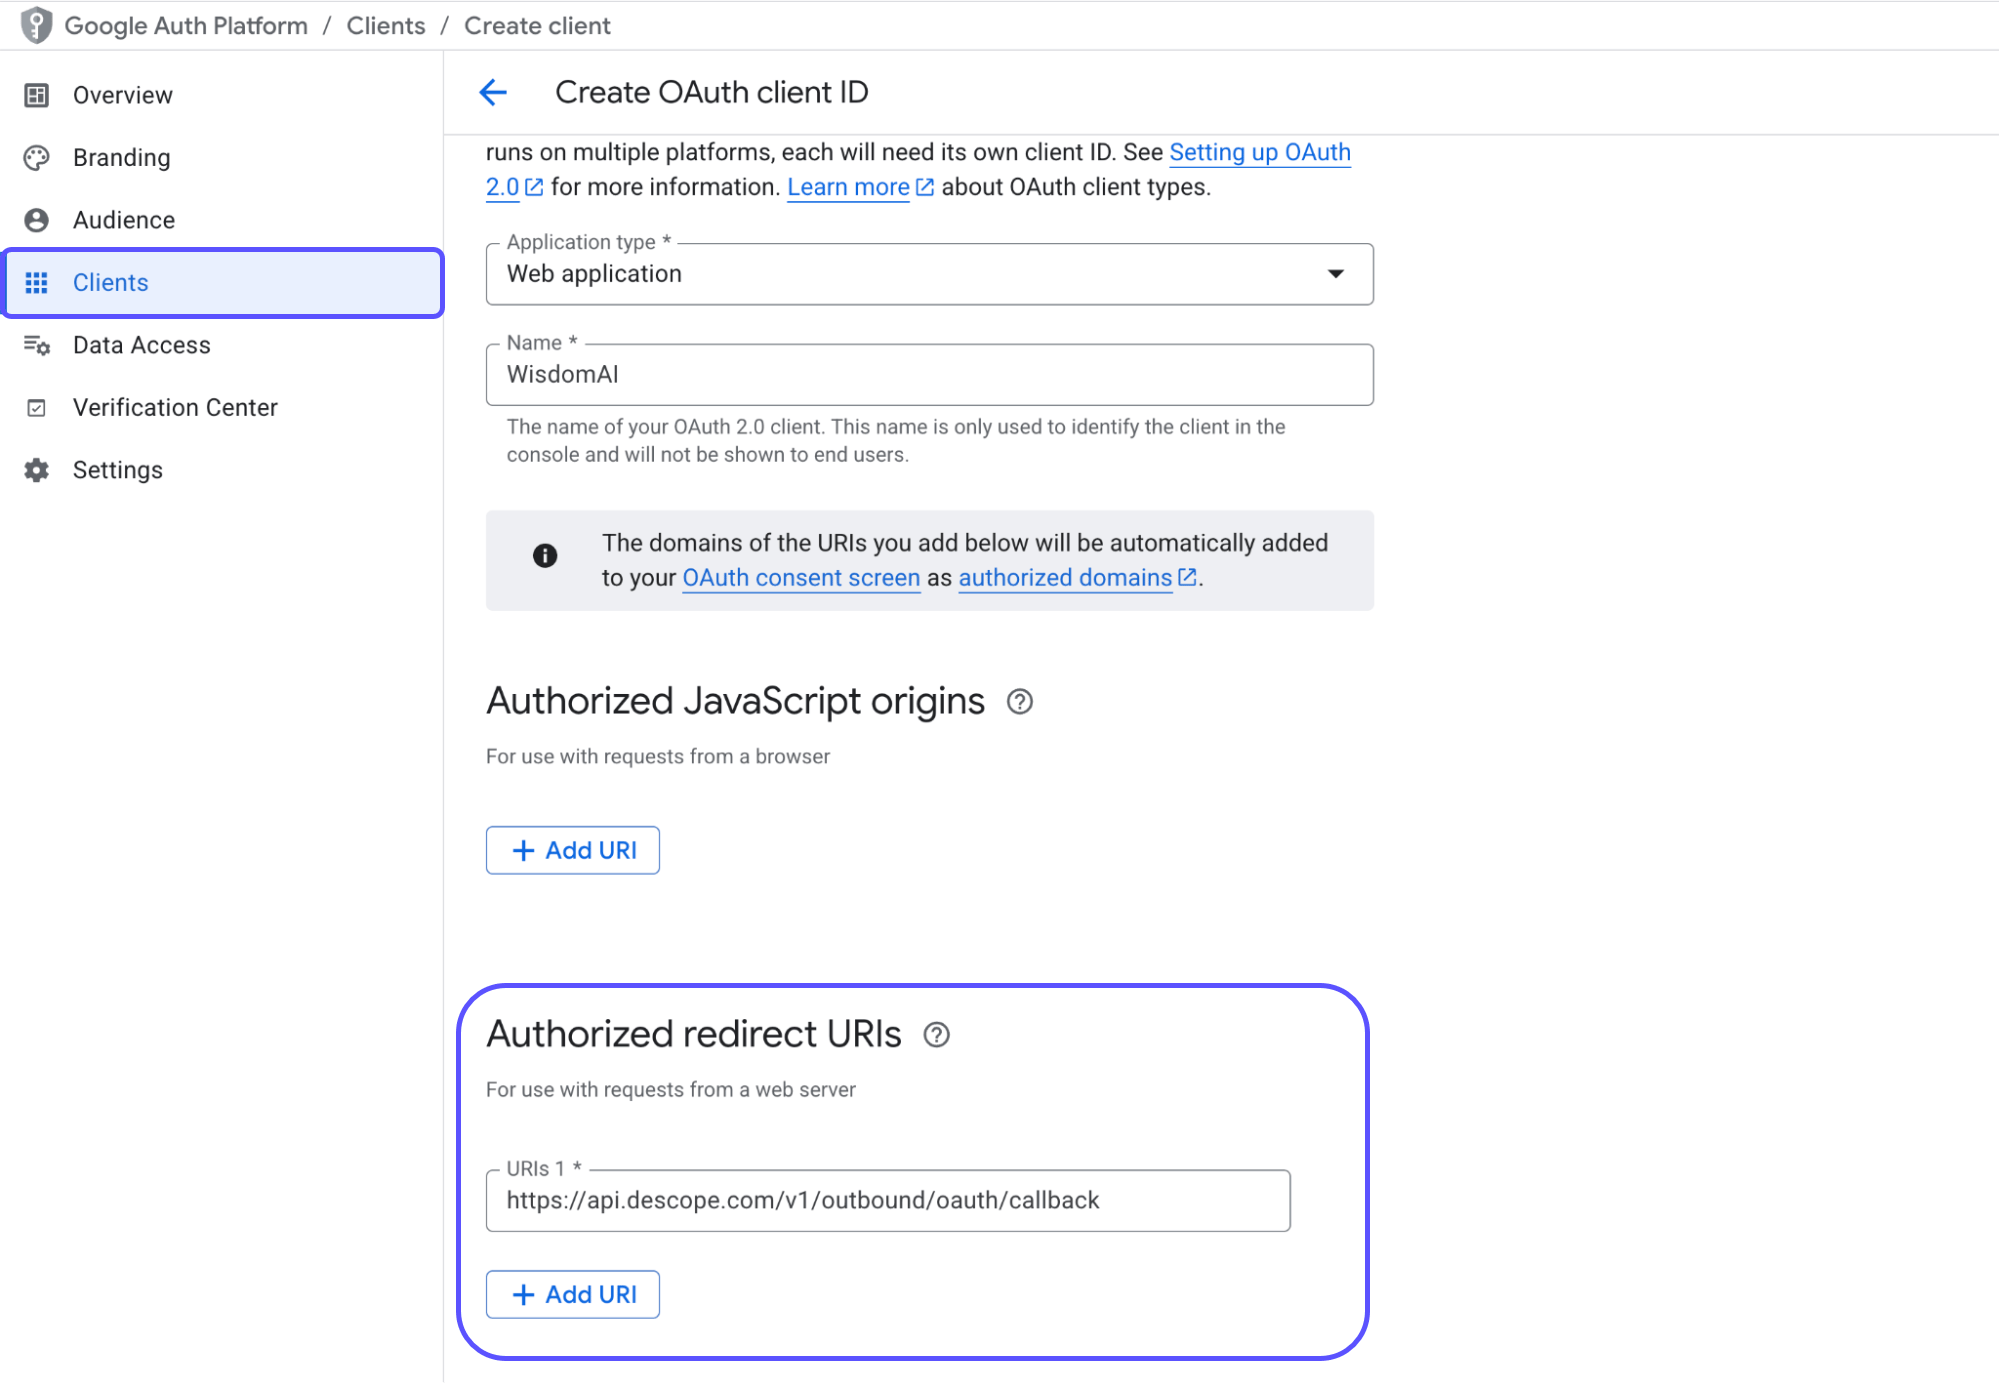
1. In the Google Cloud Console, open the **Google Auth Platform**.
2. Go to **Clients** and access **Create OAuth client ID**.
3. Set **Application type** to **Web application**.
4. Enter a **name** for the client, for example `WisdomAI`.
5. Leave **Authorized JavaScript origins** empty.
6. Under **Authorized redirect URIs**, add:
```text theme={null}
https://api.descope.com/v1/outbound/oauth/callback
```
7. Click **Create**.
### Create an OAuth client in Google Cloud
The OAuth client lets WisdomAI request access tokens on behalf of your users.
1. In the Google Cloud Console, open the **Google Auth Platform**.
2. Go to **Clients** and access **Create OAuth client ID**.
3. Set **Application type** to **Web application**.
4. Enter a **name** for the client, for example `WisdomAI`.
5. Leave **Authorized JavaScript origins** empty.
6. Under **Authorized redirect URIs**, add:
```text theme={null}
https://api.descope.com/v1/outbound/oauth/callback
```
7. Click **Create**.
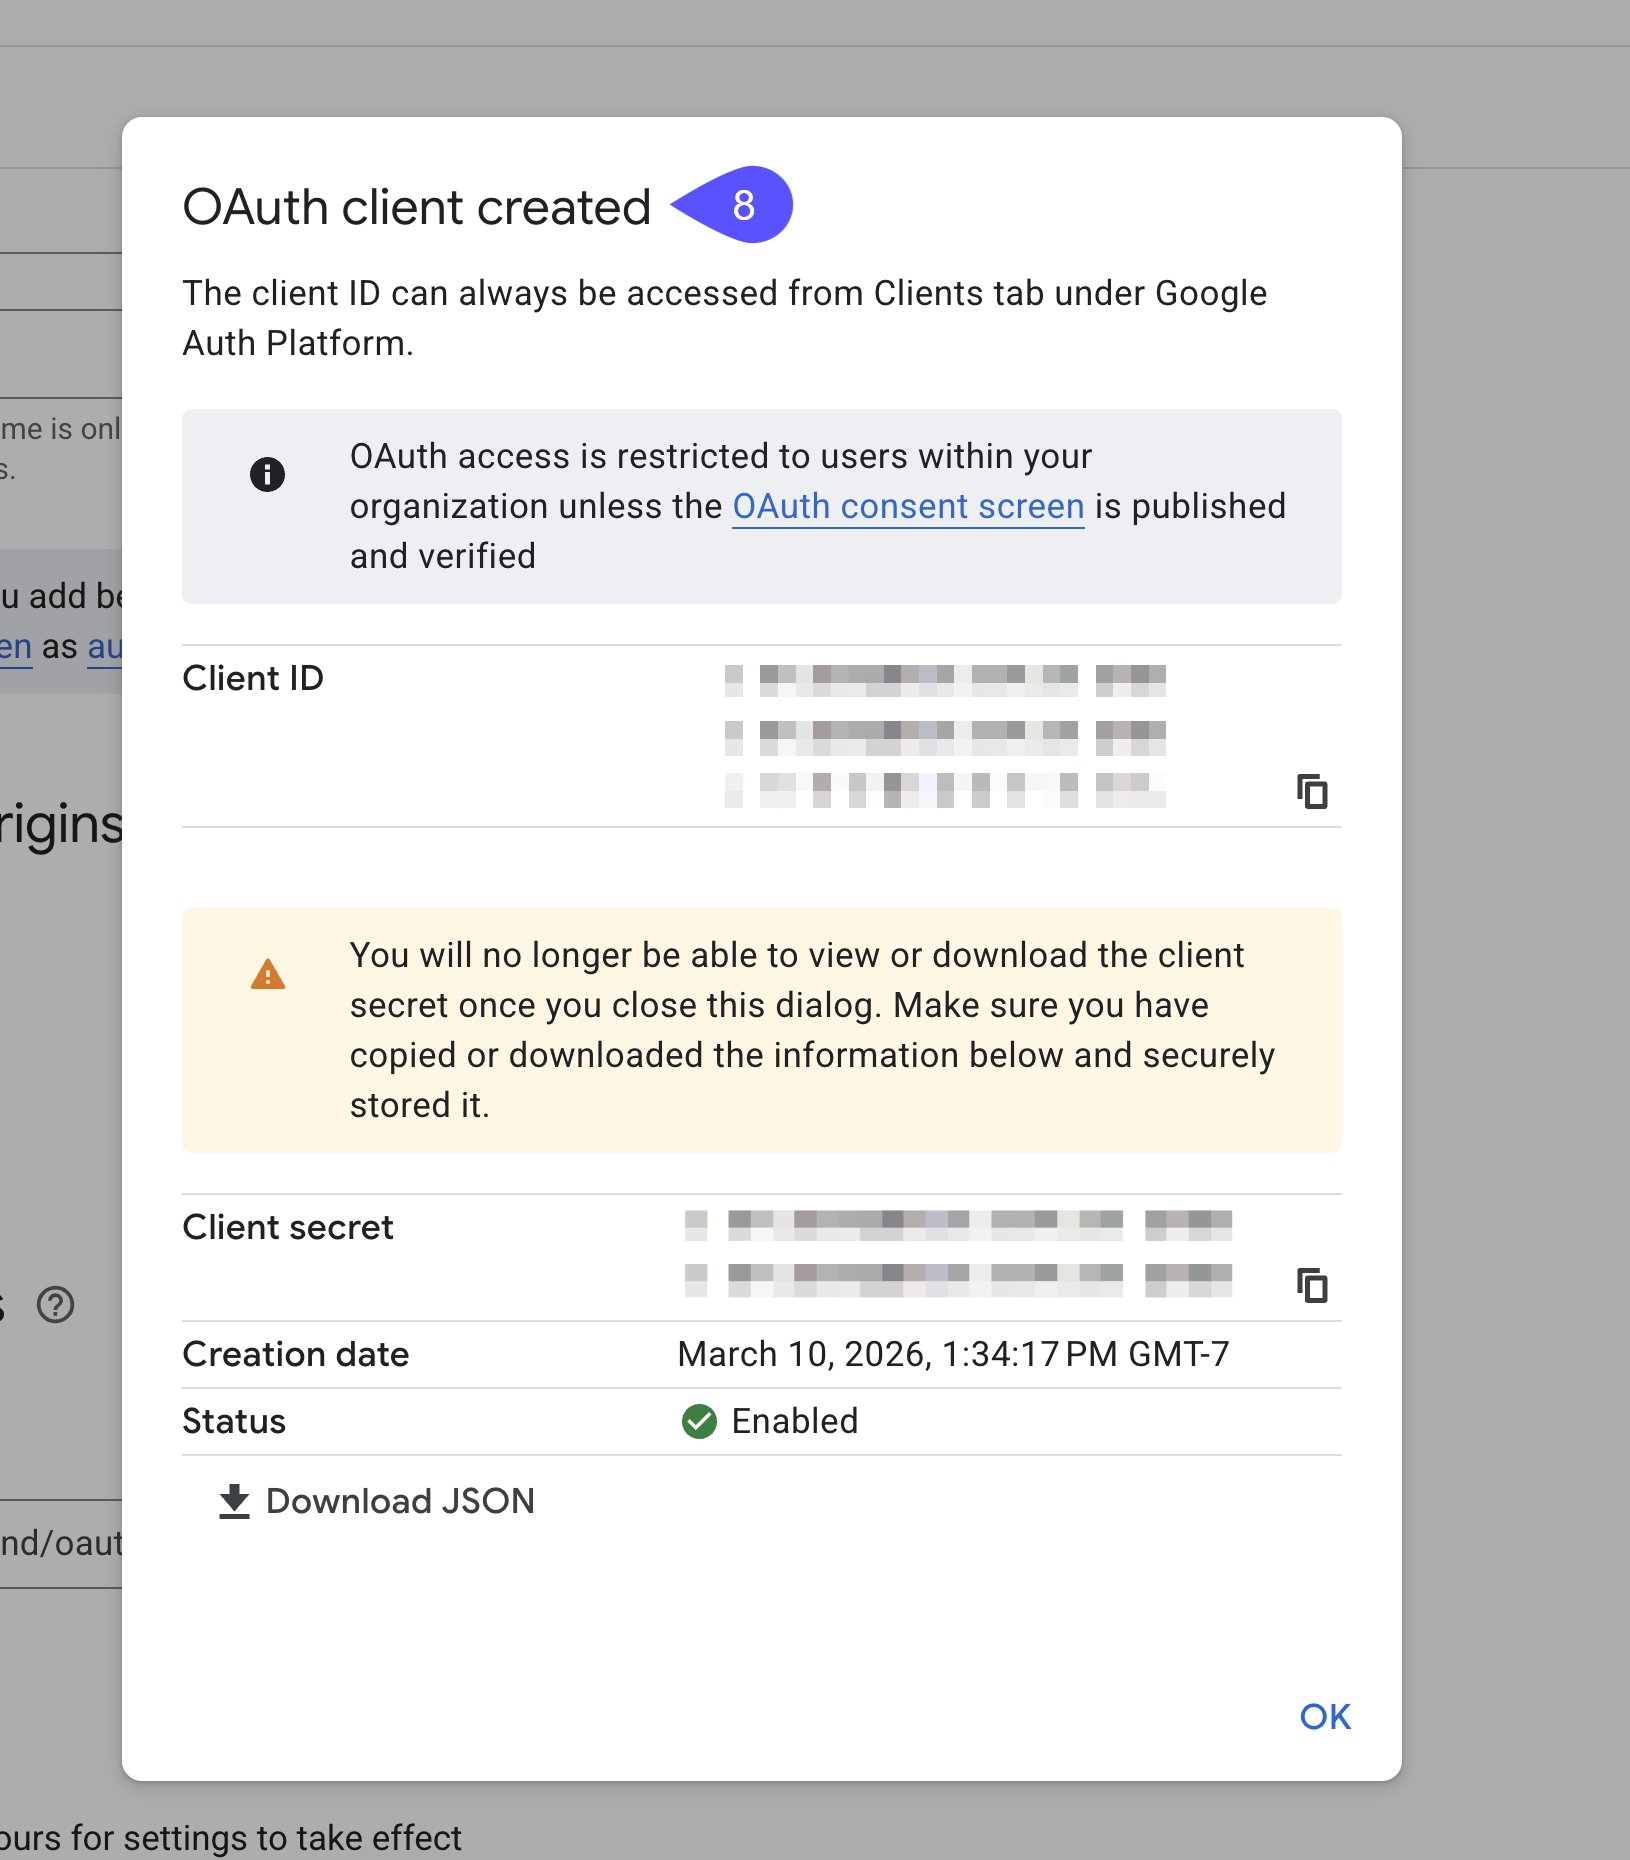
 8. Google Cloud displays a confirmation dialog with the new credentials. Copy the **Client ID** and **Client Secret**, and optionally click **Download JSON** to save them locally for reference.
 ### Authenticate in WisdomAI
Return to the WisdomAI connection form to finish the OAuth setup.
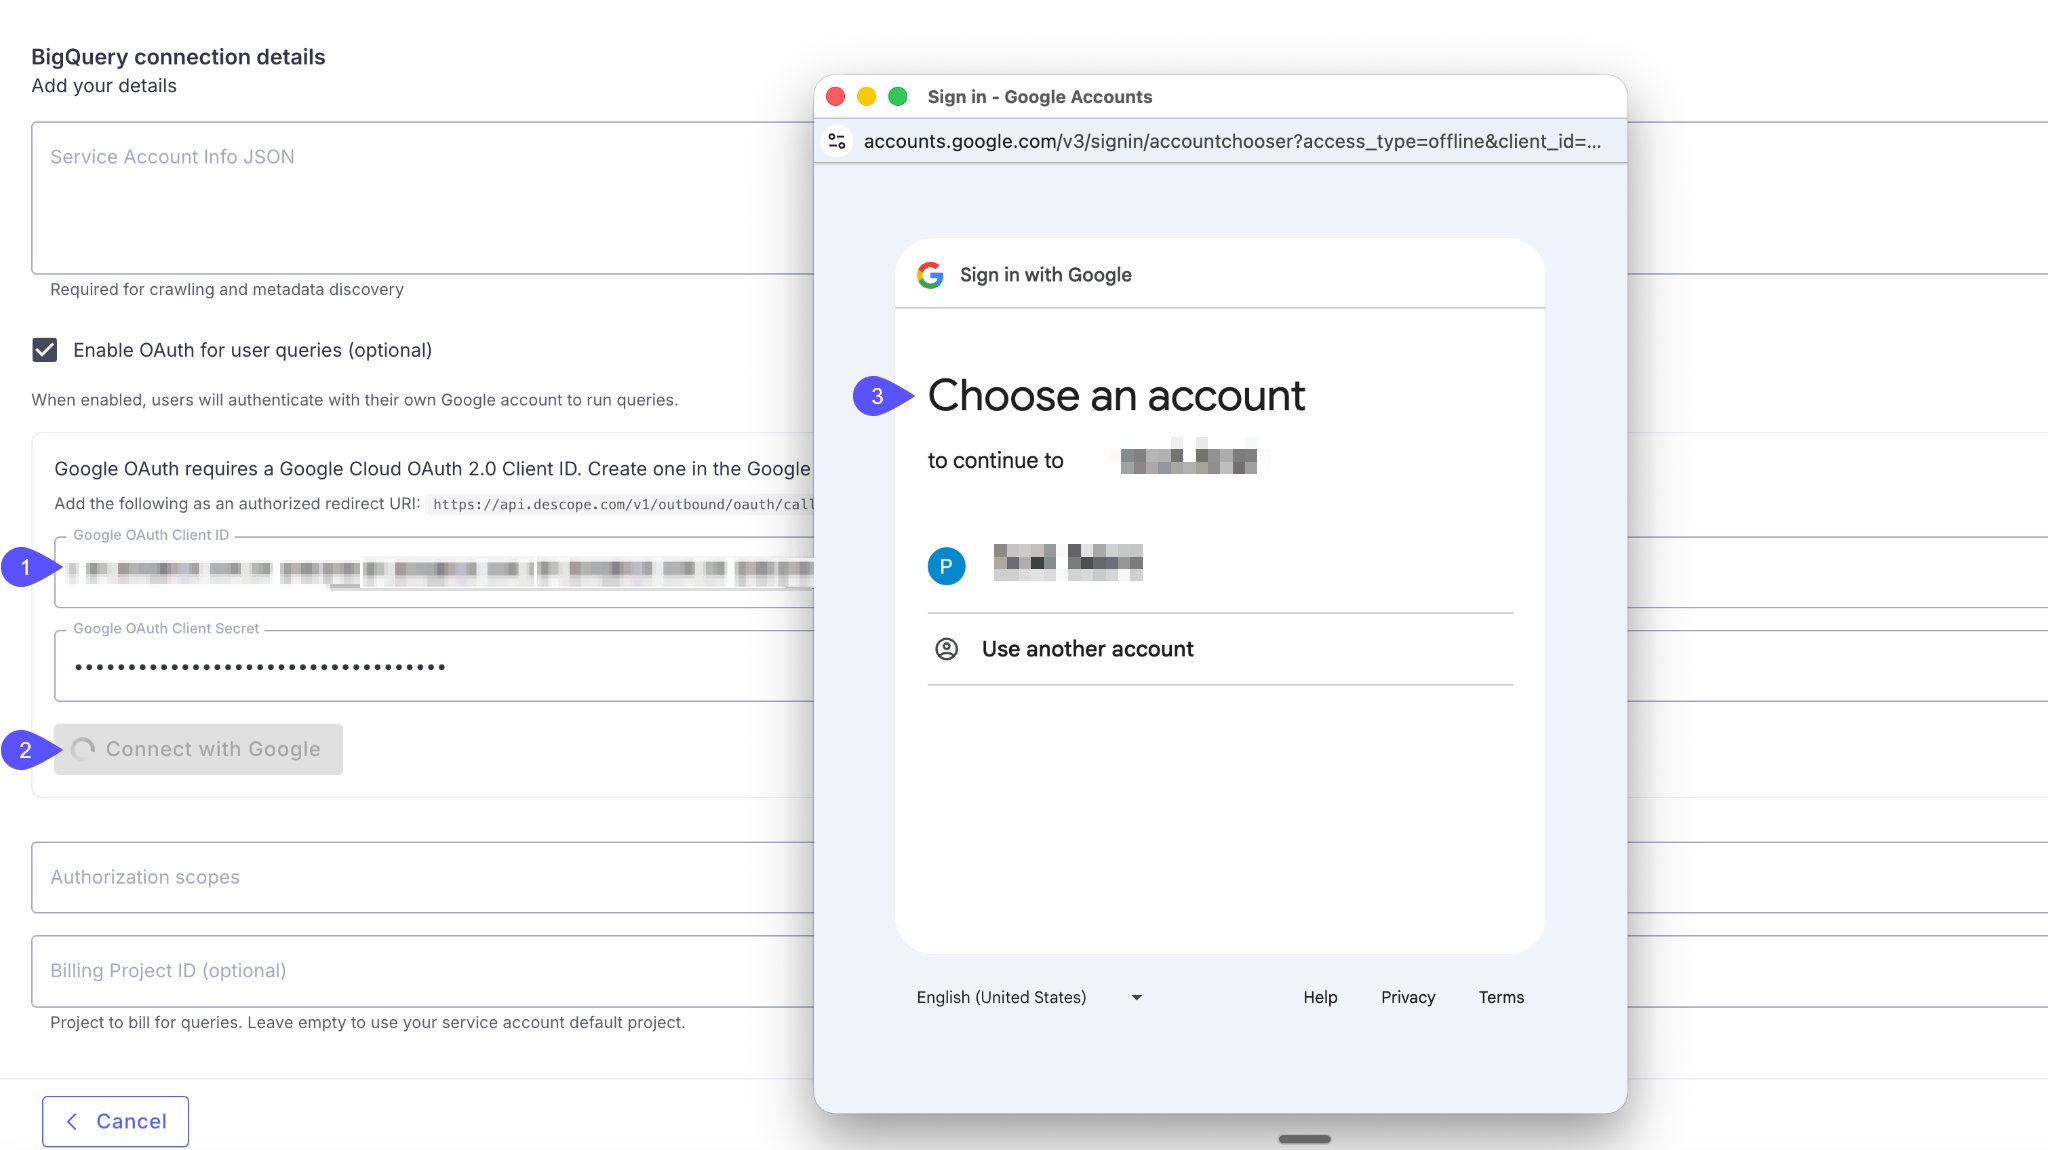
1. Paste the **Client ID** and **Client Secret** into the corresponding fields.
2. Click **Connect with Google**.
3. In the Google sign-in popup, select the Google account you want to use for authentication.
### Authenticate in WisdomAI
Return to the WisdomAI connection form to finish the OAuth setup.
1. Paste the **Client ID** and **Client Secret** into the corresponding fields.
2. Click **Connect with Google**.
3. In the Google sign-in popup, select the Google account you want to use for authentication.
 4. After successful authentication, you are redirected back to WisdomAI. Verify that the OAuth connection status shows as connected.
5. Click **Save** to complete the connection setup.
## Security considerations
Follow these practices to keep your BigQuery connection secure:
* **Least privilege.** Grant only the roles WisdomAI needs. If dataset-level access is sufficient, avoid assigning project-level roles.
* **Secure key management.** Treat the service account JSON key like a password. Store it in a secrets manager and share it only through secure channels such as a password manager.
* **OAuth for audit trails.** When you need per-user accountability for query activity, enable OAuth so each query runs under an individual Google identity.
## Troubleshooting
Common issues you might run into when setting up the connection.
* Confirm the JSON key you pasted is complete, with no missing lines or extra characters.
* Verify that the `project_id` value in the JSON key matches the project ID you entered in the connection form.
* Check that the service account has all three required roles: **BigQuery Data Viewer**, **BigQuery Job User**, and **BigQuery Read Session User**.
* Confirm those roles are assigned at the right level — either project-wide, or on every dataset WisdomAI needs to read.
* Confirm the BigQuery API is enabled in your Google Cloud project.
* Verify the spelling of the dataset and table names.
* If you set **Dataset Filters** in the connection, confirm the dataset is included in the filter.
* Confirm the service account has access to the specific dataset you are querying.
## Next steps
Connect to Snowflake directly or via a proxy using key-pair authentication and a Snowflake virtual warehouse.
Connect WisdomAI to any server implementing the Model Context Protocol (MCP) to scan metadata, build a knowledge graph, and retrieve real-time data for natural language queries.
Walk through the initial setup to connect a data source and run your first query.
4. After successful authentication, you are redirected back to WisdomAI. Verify that the OAuth connection status shows as connected.
5. Click **Save** to complete the connection setup.
## Security considerations
Follow these practices to keep your BigQuery connection secure:
* **Least privilege.** Grant only the roles WisdomAI needs. If dataset-level access is sufficient, avoid assigning project-level roles.
* **Secure key management.** Treat the service account JSON key like a password. Store it in a secrets manager and share it only through secure channels such as a password manager.
* **OAuth for audit trails.** When you need per-user accountability for query activity, enable OAuth so each query runs under an individual Google identity.
## Troubleshooting
Common issues you might run into when setting up the connection.
* Confirm the JSON key you pasted is complete, with no missing lines or extra characters.
* Verify that the `project_id` value in the JSON key matches the project ID you entered in the connection form.
* Check that the service account has all three required roles: **BigQuery Data Viewer**, **BigQuery Job User**, and **BigQuery Read Session User**.
* Confirm those roles are assigned at the right level — either project-wide, or on every dataset WisdomAI needs to read.
* Confirm the BigQuery API is enabled in your Google Cloud project.
* Verify the spelling of the dataset and table names.
* If you set **Dataset Filters** in the connection, confirm the dataset is included in the filter.
* Confirm the service account has access to the specific dataset you are querying.
## Next steps
Connect to Snowflake directly or via a proxy using key-pair authentication and a Snowflake virtual warehouse.
Connect WisdomAI to any server implementing the Model Context Protocol (MCP) to scan metadata, build a knowledge graph, and retrieve real-time data for natural language queries.
Walk through the initial setup to connect a data source and run your first query.